

An aebleskiver recipe is your ticket to mastering these fluffy, spherical Danish pancakes that’ll make your breakfast game legendary. Whether you’re a seasoned kitchen tinkerer or just getting started, these golden orbs of deliciousness are easier to nail than you’d think—you just need the right technique, quality ingredients, and a bit of patience.
Table of Contents
What Are Aebleskiver?
Think of aebleskiver as Denmark’s answer to perfectly spherical pancakes. These puffy, cloud-like treats have been a Scandinavian breakfast staple since the 1800s, and they’re experiencing a serious resurgence in modern kitchens. The magic is in their shape—that ball form creates a crispy exterior while keeping the interior soft and custardy. Unlike traditional flat pancakes, aebleskiver are cooked in a special pan with hemispherical molds, which gives them their signature appearance and texture.
The beauty of an aebleskiver recipe is that it’s forgiving. You’re working with a simple batter that relies on whipped egg whites for lift, creating that signature fluffy interior. The Danish have been perfecting this for generations, and now you can join the club.
Essential Equipment You’ll Need
You can’t make proper aebleskiver without the right tools. The most critical piece is an aebleskiver pan—a specialized cooking vessel with 7 or 8 hemispherical indentations. These pans are typically made from cast iron or non-stick aluminum, and they’re worth the investment. Cast iron versions develop seasoning over time and distribute heat beautifully, while non-stick options are more forgiving for beginners.
Beyond the pan, you’ll want a wooden skewer or specialized aebleskiver turner—a small wooden stick used to rotate the balls during cooking. Some folks use chopsticks or even knitting needles in a pinch. You’ll also need standard mixing bowls, a whisk, measuring cups and spoons, and a pastry brush for oiling the pan. A kitchen scale is optional but recommended for precision. Don’t overlook a good thermometer to monitor your pan’s temperature—consistency is everything here.
Ingredients Breakdown
Here’s what goes into a solid aebleskiver recipe that yields about 24-28 pancakes:
- 2 cups all-purpose flour – The foundation. Don’t sift unless you’re feeling fancy.
- 2 tablespoons granulated sugar – Just enough sweetness without overpowering.
- 1 teaspoon baking powder – Your lift agent for fluffiness.
- 1/2 teaspoon salt – Balances flavors and enhances sweetness.
- 2 cups whole milk – Room temperature works best. Cold milk can shock the batter.
- 2 egg yolks – Rich, creamy texture comes from these.
- 1 teaspoon vanilla extract – Optional but recommended for depth.
- 2 tablespoons melted butter – Plus extra for the pan.
- 2 egg whites – Whipped stiff, these create the signature fluff.
Quality matters here. Use fresh eggs, good butter, and milk that’s been sitting at room temperature for at least 30 minutes. Cold ingredients don’t blend smoothly and can create lumpy batter.
Batter Preparation Steps
This is where precision separates mediocre aebleskiver from exceptional ones. Start by whisking together your dry ingredients—flour, sugar, baking powder, and salt—in a large bowl. In a separate bowl, combine your milk, egg yolks, vanilla, and melted butter. Whisk these wet ingredients until they’re fully incorporated and smooth.
Now comes the critical step: create a well in your dry ingredients and pour the wet mixture into the center. Whisk gently from the center outward, incorporating flour gradually. You want a smooth batter with no lumps, but don’t overmix—a few small lumps are actually preferable to developing too much gluten, which makes them tough.
In a separate, absolutely clean bowl, whip your egg whites until stiff peaks form. This takes about 3-4 minutes with an electric mixer. Gently fold these whites into your batter in two additions, using a rubber spatula and being careful not to deflate them. The batter should look light and airy, almost mousse-like. This is the secret to that cloud-like texture everyone raves about.
Cooking Technique Mastery
Heat your aebleskiver pan over medium-high heat for about 5 minutes. The pan should be hot enough that a drop of water sizzles immediately but not so hot that it smokes. Brush each hemispherical indentation lightly with butter or oil—this is crucial for release and browning.
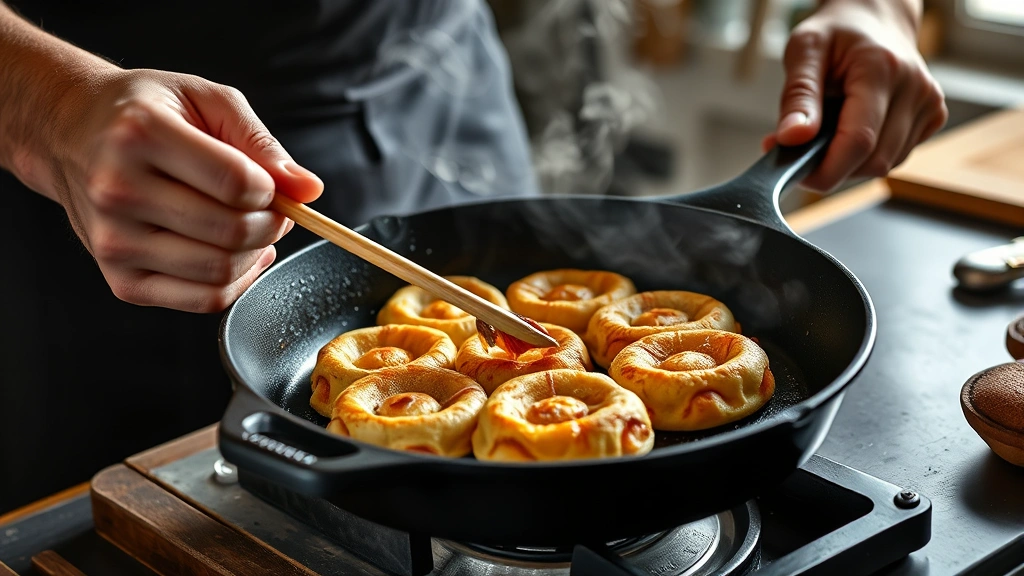
Pour batter into each mold until about three-quarters full. Cook for 2-3 minutes until the bottom sets and starts browning. This is where your wooden skewer becomes essential. Insert it into the side of each ball and gently rotate it 180 degrees, flipping the ball to cook the other side. You’re essentially turning them inside-out as they cook. This takes practice—don’t be discouraged if your first batch looks wonky.
After rotating, cook for another 2-3 minutes. The exterior should be golden brown and crispy while the interior remains soft. If you’re adding fillings like jam or apple, add a small spoonful before flipping, so it ends up in the center. Remove finished aebleskiver with a fork or small spoon, placing them on a paper towel-lined plate.
Filling Options & Variations
Traditional aebleskiver often feature spiced apples or jam, but your aebleskiver recipe can accommodate endless creativity. Before flipping each ball, add a small spoonful of your chosen filling to the center. Here are proven combinations:
- Apple-Cinnamon: Sauté diced apples with cinnamon, nutmeg, and brown sugar. Classic and perfect for fall.
- Jam & Custard: A teaspoon of your favorite jam mixed with a touch of pastry cream creates luxury.
- Chocolate Hazelnut: A dab of Nutella in the center becomes a molten surprise.
- Lemon Curd: Bright, tangy, and sophisticated—pairs beautifully with powdered sugar.
- Savory Option: Skip the sugar in the batter, add herbs, and fill with cheese or sautéed mushrooms.
The key is using small amounts—too much filling makes them difficult to flip and creates uneven cooking. Start with a teaspoon and adjust based on results.
Troubleshooting Common Issues
Your aebleskiver recipe won’t always be perfect, and that’s okay. Here’s how to solve common problems:
Dense, Heavy Pancakes: You likely overmixed the batter or didn’t whip your egg whites enough. Egg whites should form stiff peaks that don’t collapse. Also, make sure your baking powder is fresh—old leavening agents lose potency.
Difficult to Flip: Your pan isn’t hot enough or you’re not using enough oil. Ensure the pan is properly preheated and each mold gets a light brush of butter before filling.
Pale, Undercooked Exterior: Increase heat slightly and extend cooking time. You want a deep golden brown, which indicates proper caramelization and done-ness.
Raw Center: Lower your heat and extend cooking time. You’re rushing the process. Medium heat is your friend—patience yields perfect results.
Sticking to Pan: Even non-stick pans need butter or oil. Don’t skip this step. For cast iron, ensure it’s properly seasoned.
Serving Suggestions
Aebleskiver are best served immediately while still warm and crispy on the outside. Dust them generously with powdered sugar—this is non-negotiable. Serve alongside a small bowl of jam for dunking, or drizzle with warm maple syrup or honey.
For a complete breakfast experience, pair them with fresh berries, whipped cream, and a strong cup of coffee or hot chocolate. In Denmark, they’re often served at Christmas markets with warm spiced wine, but you can adapt to your preference. They’re also excellent for brunch gatherings since you can prep the batter ahead and cook to order.
If you’re serving a crowd, keep finished aebleskiver warm in a 200°F oven while you finish cooking the remaining batches. They’ll hold for about 15 minutes without losing too much crispness.
Storage Tips & Reheating
Aebleskiver are best consumed fresh, but leftovers keep for 2-3 days in an airtight container at room temperature. To reheat, place them on a baking sheet and warm in a 350°F oven for about 5 minutes until the exterior crisps back up. The microwave will make them rubbery—avoid this.

You can freeze cooked aebleskiver for up to a month. Cool them completely, place on a baking sheet to freeze individually, then transfer to a freezer bag. Reheat from frozen in a 375°F oven for about 10 minutes. The batter itself doesn’t freeze well, so always cook first if you’re planning to store.
Frequently Asked Questions
Can I make aebleskiver without a special pan?
Technically yes, but you’ll lose the signature shape and cooking characteristics. Some folks use muffin tins or donut pans, but the results aren’t quite the same. If you’re serious about making them regularly, invest in a proper aebleskiver pan—they’re affordable and last decades.
What’s the difference between aebleskiver and donut holes?
Aebleskiver are cooked in a specialized pan using a rotation technique, creating a specific texture and shape. Donut holes are typically fried in oil. Aebleskiver have a custardy center and crispy exterior; donut holes are more uniform throughout. Both are delicious but distinctly different.
Can I use whole wheat flour?
You can substitute up to 50% whole wheat flour, but use all-purpose for your aebleskiver recipe base. Whole wheat makes them denser and requires slightly more liquid. Start with a blend and adjust based on results.
How do I know when they’re done cooking?
The exterior should be golden brown and crispy to the touch. If you can insert a skewer without resistance, they’re done. The inside will be soft and slightly custardy—that’s intentional and perfect.
Can I make a dairy-free version?
Yes, substitute milk with oat or almond milk (use unsweetened versions), and use vegan butter. The results are slightly different but still delicious. You might need to add an extra tablespoon of flour to compensate for moisture differences.
What temperature should my pan be?
Medium to medium-high heat is ideal. If you have an infrared thermometer, aim for 350-375°F on the pan surface. Too hot and they’ll brown before cooking through; too cool and they’ll be dense and greasy.
Why are my aebleskiver greasy?
You’re using too much oil or your pan temperature is too low. Use just enough butter to coat each mold lightly—a pastry brush helps with this. Increase heat slightly to ensure proper browning and crisping.
Final Thoughts: Mastering an aebleskiver recipe takes a few attempts, but once you nail the technique, you’ll be making these Danish delights regularly. The combination of crispy exterior, fluffy interior, and endless filling possibilities makes them worth the learning curve. Start with the classic version, practice your flip technique, and soon you’ll be impressing family and friends with bakery-quality aebleskiver from your own kitchen. Remember, even experienced makers have occasional failures—it’s part of the craft. Keep practicing, stay patient, and enjoy the process.
For more kitchen projects and techniques, check out our guide on how to clean your washing machine to keep your kitchen appliances in top shape. If you’re planning a full breakfast setup, you might also find our article on programming your thermostat helpful for maintaining the perfect kitchen temperature. And for those interested in expanding their culinary skills with fresh ingredients, our guide on planting garlic could inspire your next cooking adventure. For additional kitchen maintenance tips, explore our garbage disposal installation guide to ensure your kitchen runs smoothly.


