

Learning how to butterfly chicken breast is one of those kitchen skills that transforms your cooking game—it’s faster than you think, and once you nail it, you’ll be butterflying breasts like a pro. Whether you’re prepping for a weeknight dinner or impressing guests, this technique creates thinner, more evenly cooked chicken that cooks faster and absorbs flavors better than thick, uncut breasts.
Table of Contents
Why Butterfly Chicken Breast?
Let me be straight with you—butterflying chicken breast isn’t just a fancy restaurant trick. It’s practical. A standard chicken breast is thick in the middle and thin at the edges, which means the thin parts cook through while the thick center stays undercooked. Butterflying solves this by creating an even thickness throughout. You end up with uniform cooking, better seasoning absorption, and meat that’s tender instead of dry. Plus, thinner chicken cooks in about half the time. If you’re steaming broccoli as a side dish, butterflied chicken finishes right around the same time—no more juggling cook times.
Tools You’ll Actually Need
You don’t need fancy equipment here. Grab a sharp chef’s knife—and I mean sharp. A dull knife is dangerous because you’ll apply more pressure and lose control. An 8-inch chef’s knife is ideal, but any sharp blade works. Some people use kitchen shears, which is fine if you’re comfortable with them. I prefer a knife because you have more control over depth. A cutting board (preferably with a groove to catch juices) and maybe some paper towels to keep your hands dry—that’s it. No special butterflying kit needed.
The 5-Step Butterfly Method
Step 1: Start with the Right Chicken
Pick breasts that are roughly the same size. Thawed chicken is easier to work with than frozen, so plan ahead. Pat the breast dry with paper towels—wet chicken is slippery and harder to control. Place it on your cutting board with the thicker side facing you.
Step 2: Position Your Hand Correctly
Place your non-knife hand on top of the breast, fingers spread flat but relaxed. Don’t press down hard—just steady it. Your hand keeps the breast from sliding around while you cut. Position your fingers away from the blade’s path, obviously.
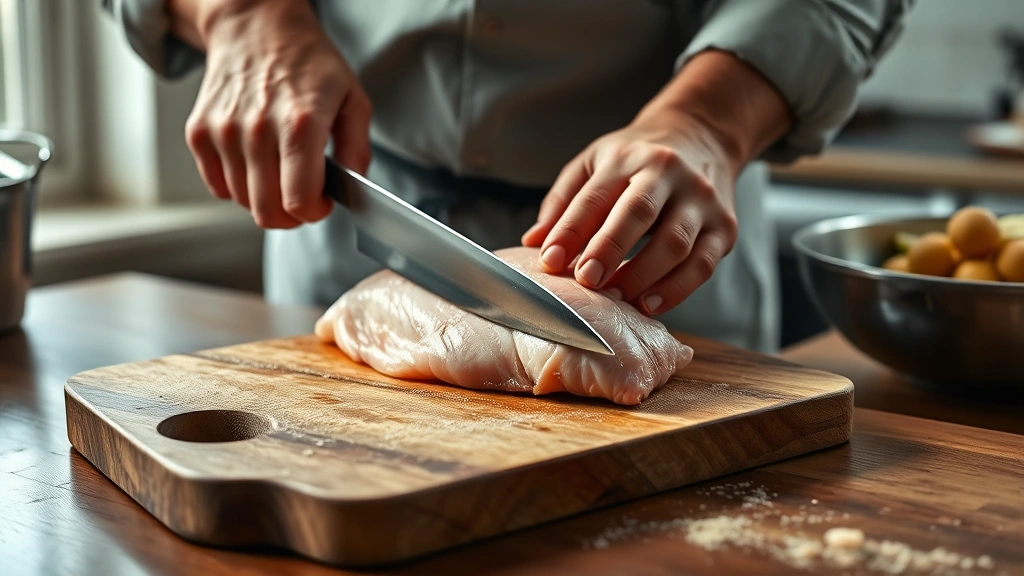
Step 3: Make the Initial Cut
Hold your knife horizontally, parallel to the cutting board. Place the blade on the thickest side of the breast, about a third of the way down from the top. This is where precision matters. You’re going to cut horizontally into the breast, but not all the way through. You want to leave about half an inch of meat attached along one long edge—this creates the hinge that keeps the two halves connected.
Step 4: Cut Slowly and Deliberately
Move the knife slowly into the breast, keeping it level. Don’t saw back and forth like you’re cutting bread. Use smooth, deliberate strokes. You’ll feel the knife gliding through the meat. Stop when you’re about half an inch from the opposite edge. The goal is one connected piece that opens like a book, not two separate pieces.
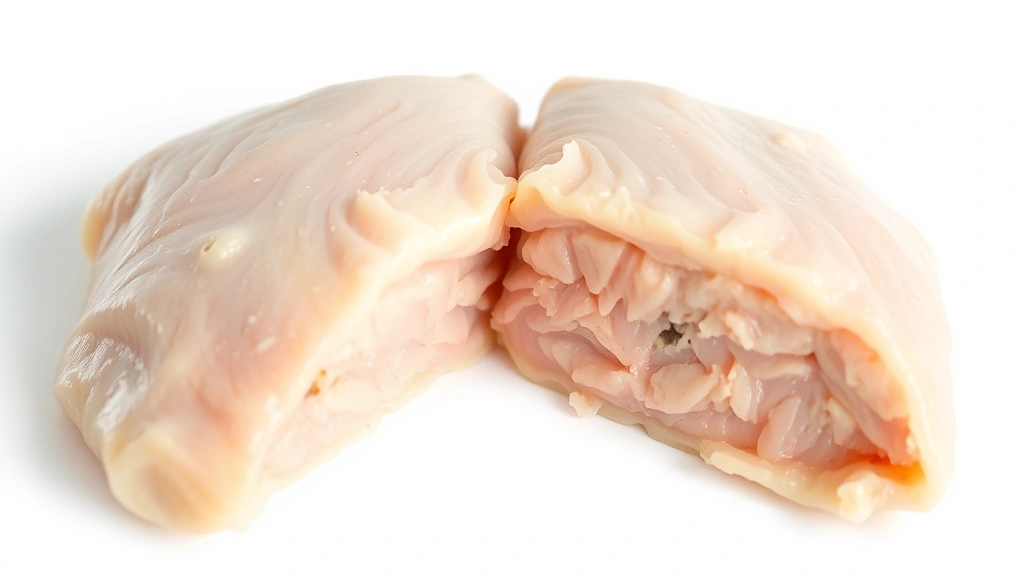
Step 5: Open and Flatten
Once you’ve cut most of the way through, gently pull the top half away from the bottom half. It should open like a book with that hinge of meat holding it together. If it breaks, you went too far—but honestly, it still cooks fine. Now, if the thickness is still uneven, you can gently pound it with a meat mallet on the thicker sections. Use the flat side, not the pointy side, and go easy. You’re evening out thickness, not pulverizing.
Common Mistakes to Avoid
The biggest mistake is cutting all the way through and ending up with two separate pieces. That’s not technically wrong, but you lose the hinge, and the pieces can separate during cooking. Second mistake: cutting too fast and losing control. Take your time. Third: not keeping your knife sharp enough. A sharp knife requires less pressure, which means better control. Fourth: butterflying chicken that’s too cold or frozen. Thaw it first—it’s much easier to work with. Fifth: forgetting to pat it dry. Wet chicken slides around, and you’ll lose precision.
Cooking Your Butterflied Breast
Butterflied chicken cooks faster than regular breasts—usually 12-15 minutes in a hot skillet instead of 20-25 minutes. Heat your pan (cast iron or stainless steel) until it’s hot, add a little oil, and lay the butterfly flat. Don’t move it around—let it develop a golden crust. Flip once, halfway through. Use a meat thermometer to check doneness. The internal temperature should hit 165°F (74°C) at the thickest part. If you want to stuff your butterflied breast—say, with cheese and spinach or herbs—do it before cooking. Just don’t overstuff, or it’ll leak out during cooking.
Flavor Combinations That Work
The beauty of butterflied chicken is how quickly it absorbs marinades and seasonings. A simple salt, pepper, and garlic combo works great. For something more interesting, try an Italian herb blend with lemon zest. If you’re pairing this with fresh pineapple for a tropical twist, a teriyaki-based marinade complements both beautifully. You can also stuff it with goat cheese and sun-dried tomatoes, or go classic with spinach and ricotta. The thin, even surface means seasonings stick better and flavors penetrate faster—usually 30 minutes in a marinade is enough instead of hours.
Storage and Prep Tips
You can butterfly chicken ahead of time and refrigerate it for up to two days. Store it in an airtight container or wrapped tightly in plastic wrap. If you want to freeze butterflied breasts, lay them flat on a baking sheet, freeze for a couple hours, then transfer to a freezer bag. This prevents them from sticking together. They’ll keep for about three months frozen. When you’re ready to cook, you don’t need to thaw—just add a few extra minutes to the cooking time. For meal prep, butterflying multiple breasts at once saves time later in the week. Do it all on Sunday, and you’ve got ready-to-cook protein for the next three days.
Frequently Asked Questions
Can I butterfly chicken breast with kitchen shears instead of a knife?
Absolutely. Kitchen shears work well if you’re comfortable with them. Some people actually prefer shears because there’s less risk of the blade slipping. Just make sure they’re sharp and sturdy enough to handle raw chicken. The technique is similar—you’re cutting horizontally through the thickest part, leaving a hinge attached.
What if I cut all the way through and it separates?
No big deal. You now have two thin cutlets instead of one butterflied breast. They’ll cook even faster—about 8-10 minutes. You can still stuff them if you want, or just cook them as-is. It’s not ideal for presentation, but the taste and texture are the same.
How thick should the butterflied breast be?
Aim for about three-quarters of an inch thick, maybe a bit less. If it’s thinner than half an inch, it’ll cook too fast and might dry out. If it’s thicker than an inch, you’re back to uneven cooking. The goal is uniform thickness so everything cooks at the same rate.
Do I need to pound it after butterflying?
Not always. If the thickness is already pretty even, skip it. If there are thick and thin spots, a gentle pounding with the flat side of a meat mallet evens things out. Don’t go crazy—you’re not making schnitzel. Just a few light taps on the thicker sections.
Can I butterfly frozen chicken?
Technically yes, but it’s much harder. The meat is stiff and slippery, and your knife is more likely to slip. Thaw it in the refrigerator overnight instead. It takes planning, but it’s worth it for safety and precision.
What’s the best way to season butterflied chicken before cooking?
Keep it simple or go bold—butterflied chicken absorbs flavors fast. A basic salt and pepper works great. For more flavor, use a dry rub (garlic powder, paprika, Italian herbs) or a quick marinade (30 minutes is enough). If you’re stuffing it, season both the outside and the filling.
How do I know when it’s cooked through?
Use a meat thermometer. The internal temperature should reach 165°F (74°C) at the thickest part. If you don’t have a thermometer, cut into the thickest part—there should be no pink, and the juices should run clear. But honestly, get a thermometer. They’re cheap and take the guesswork out of cooking.
For more kitchen techniques and food prep ideas, check out Family Handyman’s guide to sharpening kitchen knives and This Old House’s kitchen section. And if you’re looking for creative ways to use your cooking skills, try making themed treats for your next dinner party.
The Bottom Line
Butterflying chicken breast is a skill that pays dividends. Once you’ve done it a few times, it becomes second nature—probably takes you less than two minutes per breast. You end up with evenly cooked, flavorful chicken that’s ready faster than traditional methods. The technique opens up stuffing options, marinading possibilities, and cleaner presentation. Sharp knife, steady hand, and patience—that’s all you need. Start with one breast, go slow, and you’ll be butterflying like a chef in no time.


