

Let’s be honest—the moment your turkey comes out of the oven, you’ve got maybe 15 minutes before panic sets in. The bird is resting, your guests are circling the kitchen, and you’re staring at a roasting pan full of brown, crusty goodness wondering, “How do I turn this into actual gravy?” This is where most home cooks freeze up. But here’s the real talk: how to make gravy from turkey drippings isn’t rocket science. It’s actually one of the easiest things you can master in the kitchen, and once you nail it, you’ll never buy jar gravy again.
The secret? Understanding that turkey drippings are basically liquid gold—they contain all the caramelized flavors from your bird. You just need to know how to extract them, thicken them, and season them properly. In the next 20 minutes, you’ll have silky, restaurant-quality gravy that tastes like actual turkey, not salt and cornstarch.
What You Actually Need to Make Turkey Dripping Gravy
Before you panic about specialty equipment, here’s what you actually need:
- A roasting pan (the one your turkey cooked in—don’t wash it yet)
- A fine-mesh strainer or cheesecloth (to catch the solids)
- A saucepan or small pot (2-3 quarts minimum)
- A wooden spoon or whisk
- Flour or cornstarch (for thickening)
- Butter (optional but recommended)
- Broth (chicken, turkey, or vegetable—as backup)
- Salt, pepper, and fresh herbs
That’s it. You don’t need a gravy boat, special strainers, or any fancy gadgets. The roasting pan is your hero here. Those browned bits stuck to the bottom? That’s called fond, and it’s where 90% of your flavor lives.
Step-by-Step: How to Make Gravy from Turkey Drippings
Let’s walk through the actual process. This assumes your turkey is out of the oven and resting on a cutting board (which it should be for 15-20 minutes anyway).
Step 1: Pour Off the Drippings
Carefully tilt your roasting pan and pour the liquid into a measuring cup or bowl. You should have somewhere between 1 to 2 cups of liquid, depending on your turkey size. Don’t worry if it looks murky or has fat floating on top—that’s normal and actually desirable. That fat is flavor.
Step 2: Separate the Fat (Optional But Recommended)
Here’s where people get confused. You have two choices: embrace the fat or skim it. If you want rich, traditional gravy, keep some of that fat. If you want lighter gravy, skim most of it off using a fat separator (those little pitcher things) or a spoon. I recommend keeping about 2-3 tablespoons of fat in your liquid. The rest can go.
Pro tip: If your drippings have cooled, the fat will solidify on top, making it easier to separate. But you’re working on a timeline here, so room-temperature separation is fine.
Step 3: Deglaze the Pan
This is the step that makes the difference between okay gravy and wow gravy. Put your roasting pan directly on the stovetop over medium-high heat. Pour in about 1 cup of broth (chicken or turkey—doesn’t matter). Use a wooden spoon to scrape up all those brown, crusty bits stuck to the bottom. This takes about 2-3 minutes. You’re literally dissolving all that caramelized turkey flavor into the liquid. That’s your flavor base right there.
Step 4: Combine and Strain
Pour the deglazing liquid from the roasting pan into a saucepan, then add your reserved drippings. If you don’t have enough liquid (you need at least 2 cups), top it off with more broth. Strain everything through a fine-mesh strainer to remove any bits of turkey skin, herbs, or other solids. You should end up with clear-ish, flavorful liquid.
Step 5: Make Your Thickener
This is where the roux or slurry comes in. If you’re using a roux (the traditional method), melt 2-3 tablespoons of butter in your saucepan over medium heat. Once it’s foamy, whisk in the same amount of flour (2-3 tablespoons). Stir constantly for about 1-2 minutes. You’re cooking out the raw flour taste. It should smell a bit nutty.
If you’re using a slurry (faster, less fussy), mix 2-3 tablespoons of cornstarch with 3-4 tablespoons of cold water in a small bowl until smooth. Set it aside.
Step 6: Add Your Liquid Slowly
This is where most people mess up. If you’re using a roux, slowly pour your strained drippings into the roux while whisking constantly. Don’t dump it all in at once or you’ll get lumps. Take your time—this should take 2-3 minutes. If you’re using a slurry, bring your drippings to a simmer, then slowly pour in the slurry while whisking. Either way, keep whisking.
Step 7: Simmer and Thicken
Once your liquid is incorporated, let it simmer for 2-3 minutes. It should noticeably thicken. If it’s still too thin, make another small batch of slurry or roux and repeat. If it’s too thick, add more broth a little at a time. You’re aiming for the consistency of heavy cream—thick enough to coat the back of a spoon, but still pourable.
This entire process should take about 10-15 minutes from start to finish. Your turkey is still warm, your guests are happy, and you’re a hero.
The Roux Method vs. The Slurry Method
People get weirdly passionate about which thickening method is “correct.” Here’s the truth: both work. Choose based on your comfort level and timeline.
The Roux Method is the classic French technique. You cook equal parts fat and flour together (a roux), then whisk in your liquid. The advantage? It adds richness and a slightly deeper, toasted flavor. The disadvantage? It requires more attention and can burn if you’re not careful. Also, you need butter or fat on hand.
Think of the roux like a sponge that absorbs the liquid gradually. You’re building structure as you go. This is what professional chefs use, and for good reason—it creates the silkiest texture.
The Slurry Method is faster and more forgiving. You mix cornstarch with cold water, then stir it into your simmering liquid. The advantage? It’s nearly impossible to mess up. The disadvantage? Some people claim it makes gravy slightly less silky (though honestly, most people can’t tell the difference). Also, slurry-thickened gravy can break down if you reheat it multiple times.
For Thanksgiving when you’re stressed and have 12 people waiting, the slurry method is your friend. For a Sunday dinner when you have time to breathe, go with the roux.
Here’s a hybrid approach that works great: Make a small roux (1 tablespoon butter + 1 tablespoon flour), whisk in your drippings, then if it’s not thick enough, finish with a slurry. Best of both worlds.
Fixing Common Gravy Disasters

Let’s talk about what goes wrong, because something probably will.
Gravy is too thin. This is the most common problem. Solution: Make a slurry (cornstarch + water) or a small roux and whisk it in. Do this in small batches—you can always add more thickener, but you can’t remove it.
Gravy is too thick. Whisk in more broth, one tablespoon at a time. If you don’t have broth, water works in a pinch, though it’ll dilute the flavor slightly.
Gravy has lumps. This usually means your roux wasn’t smooth or you added liquid too fast. Solution: Pour it through a fine-mesh strainer. Or use an immersion blender to smooth it out. Or just tell people the lumps are “rustic texture.”
Gravy tastes bland. You forgot to season it. Add salt, pepper, and taste as you go. A pinch of fresh thyme or sage helps too. Taste it before serving—this is non-negotiable.
Gravy broke or separated (looks greasy and weird). This usually happens if you added the liquid too fast to a roux or if your heat was too high. Start over with a new roux and add your gravy slowly back in while whisking. Or, if you’re using a slurry-thickened gravy, this can happen during reheating. Whisk it vigorously over low heat and it usually comes back together.
Gravy tastes too salty. Add a splash of broth or water and taste again. If you really overshot it, peel and add a raw potato wedge, simmer for 5 minutes, then remove it. The potato absorbs salt.
Pro Tip: Taste your gravy 5 minutes before serving. This gives you time to fix anything that’s off. Most people don’t do this and end up with underseasoned gravy. Don’t be that person.
Seasoning Your Gravy Like a Pro
This is where gravy goes from “fine” to “people ask for the recipe.” Seasoning is 80% of the battle.
Start with salt and pepper. Taste, adjust, taste again. Don’t be shy. Gravy needs more seasoning than you think it does. A good rule of thumb: if you’re unsure whether it’s seasoned enough, it probably isn’t.
After salt and pepper, think about depth. Fresh herbs are your secret weapon. A teaspoon of fresh thyme, sage, or rosemary makes a massive difference. If you don’t have fresh, dried herbs work, but use half the amount (they’re more concentrated).
A splash of Worcestershire sauce adds umami and complexity. So does a teaspoon of Dijon mustard. A pinch of garlic powder or onion powder works too, but again—go easy. You’re enhancing, not overpowering.
Some people add a tiny splash of red wine or sherry. This is optional but sophisticated. About 2 tablespoons is plenty.
Here’s my standard seasoning formula for 2 cups of gravy:
- 1 teaspoon salt (adjust to taste)
- ½ teaspoon black pepper
- 1 teaspoon fresh thyme (or ½ teaspoon dried)
- ½ teaspoon Worcestershire sauce
- A pinch of garlic powder (optional)
Taste after each addition. Gravy seasoning is personal—some people like it herbier, some people like it simpler. The point is to taste as you go and adjust.
Make-Ahead Gravy: A Lifesaver Strategy
Here’s the thing nobody tells you: you can make turkey dripping gravy the day before, and it’s actually better for it. The flavors meld and deepen overnight.
Here’s how: After you’ve made your gravy, let it cool completely, then pour it into a container and refrigerate it. The fat will solidify on top, which is fine—just leave it there. It protects the gravy underneath.
The next day, reheat it gently over low heat, stirring frequently. If it’s too thick (it might be because fat solidifies), add a splash of broth. If it’s too thin, make a quick slurry. Taste and adjust seasoning.
This strategy is a game-changer for Thanksgiving. You can make gravy while you’re prepping vegetables, and then on Turkey Day, you just reheat it while you’re carving the bird. No stress, no scrambling.
You can also make gravy from turkey bones and broth the day before, then thicken it on the day-of with your actual drippings. Family Handyman’s kitchen section has some solid tips on advance prep strategies that apply here.
Storing and Reheating Leftover Gravy
Gravy keeps in the refrigerator for about 3-4 days in an airtight container. It also freezes beautifully for up to 3 months. Just pour it into a freezer bag or container, label it with the date, and you’re done.
To reheat from the fridge: Pour it into a saucepan and warm over low to medium heat, stirring occasionally. Add a splash of broth if it’s too thick.
To reheat from frozen: Thaw it overnight in the fridge first (safest), then reheat as above. Or, if you’re in a hurry, you can reheat it directly from frozen over low heat, stirring frequently. It’ll take longer but it works.
If your reheated gravy breaks or looks separated, whisk it vigorously over low heat. Usually it comes back together. If it doesn’t, pour it through a fine-mesh strainer and it’ll look smooth again.
One more thing: if you’re using a slurry-thickened gravy and you’re reheating it multiple times, it might start to thin out. This is because cornstarch breaks down with repeated heating. If that happens, make a fresh small slurry and whisk it in. It’s not a big deal.
For more detailed food storage guidance, This Old House’s kitchen guides have excellent information on food safety and storage best practices.
According to Bob Vila’s home and kitchen resources, proper storage of gravies and sauces is essential for food safety, especially around the holidays when you’re cooking large quantities.
Frequently Asked Questions
Can I make gravy without flour or cornstarch?
– Yes. You can use arrowroot powder, tapioca starch, or even potato starch. They all work similarly to cornstarch. You can also use a beurre manié (equal parts softened butter and flour mixed into a paste) whisked directly into your simmering gravy. Or, if you’re really committed to avoiding starch, you can reduce your gravy by simmering it uncovered until it’s naturally thicker—this takes longer but works.
What if I don’t have turkey drippings because my turkey was cooked in a bag?
– You can still make gravy. Carefully open the bag and pour the drippings into a container. Or, make a gravy from scratch using turkey or chicken broth, butter, flour, and seasonings. It won’t have quite the same depth, but it’ll be good. You can also add a tablespoon of tomato paste or Worcestershire sauce to boost the flavor.
How much gravy should I make?
– A good rule of thumb is about ¼ cup of gravy per person. For 8 people, that’s 2 cups. For 12 people, that’s 3 cups. Make a little extra—people always want more than you think.
Can I use the drippings from a turkey breast instead of a whole turkey?
– Absolutely. Turkey breast drippings are just as flavorful. You might have less volume, so you may need to add more broth, but the process is identical.
What’s the difference between gravy and sauce?
– Technically, gravy is a sauce made from meat drippings. So all gravy is sauce, but not all sauce is gravy. For our purposes, they’re the same thing.
Can I make this gravy ahead and freeze it?
– Yes, absolutely. Cool it completely, pour it into a freezer-safe container, and freeze for up to 3 months. Thaw overnight in the fridge and reheat gently over low heat.
My gravy tastes too meaty or gamey. How do I fix it?
– A splash of cream or milk mellows out strong flavors. Add it slowly while tasting. You can also add a pinch of sugar (just a pinch) to balance it. Fresh lemon juice works too—about ½ teaspoon at a time.
Is it better to use a roux or slurry for gravy?
– Both work. Roux creates a silkier texture and adds richness, but requires more attention. Slurry is faster and more forgiving. For Thanksgiving stress, go with slurry. For a relaxed Sunday dinner, use a roux.
Can I use the drippings from a store-bought rotisserie chicken?
– Yes, though store-bought chicken drippings are less flavorful than homemade turkey. You’ll probably want to add some broth and extra seasonings to compensate. It’s a decent shortcut if you’re in a bind.
What if my turkey was dry? Will the gravy help?
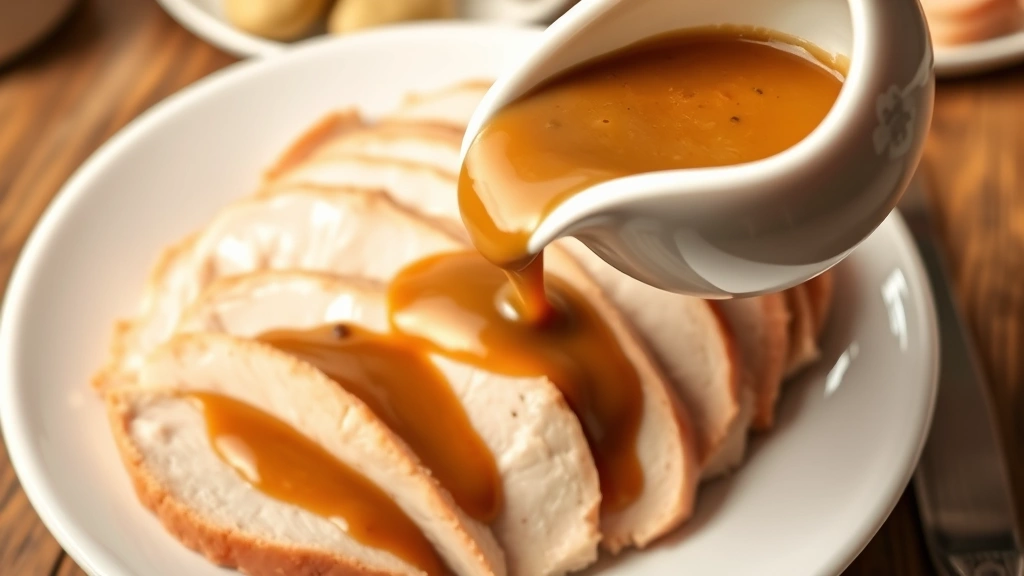
– Yes. Gravy is literally designed to help dry meat taste better. Spoon it generously over your turkey slices. This is actually one of the reasons gravy exists.
Related resources: How to Prevent Apples from Browning | How to Tell if a Pineapple is Ripe | How to Clean a Washing Machine | How to Connect Brother Printer to WiFi


