
Mail merge intimidates a lot of people. You’ve got a spreadsheet full of names and addresses, you need to blast out personalized letters, and the whole thing feels like it should be complicated. Here’s the real talk: how to mail merge from Excel to Word is actually one of the most straightforward automation tricks in Microsoft Office. Once you nail it, you’ll wonder why you ever typed individual letters manually.
The process is straightforward: connect your Excel data source to a Word template, let Word pull in the personalized fields, and generate dozens (or thousands) of customized documents in minutes. No coding. No third-party software. Just native Microsoft tools doing what they’re built for.
This guide walks you through every step, from prepping your Excel spreadsheet to troubleshooting the inevitable hiccups. Whether you’re sending invoices, form letters, or holiday cards, mastering this skill will save you hours.
Prepare Your Excel Data Source
Your Excel spreadsheet is the backbone of everything. Get this wrong, and your mail merge will be a disaster. Get it right, and you’re 80% done.
Here’s what you need:
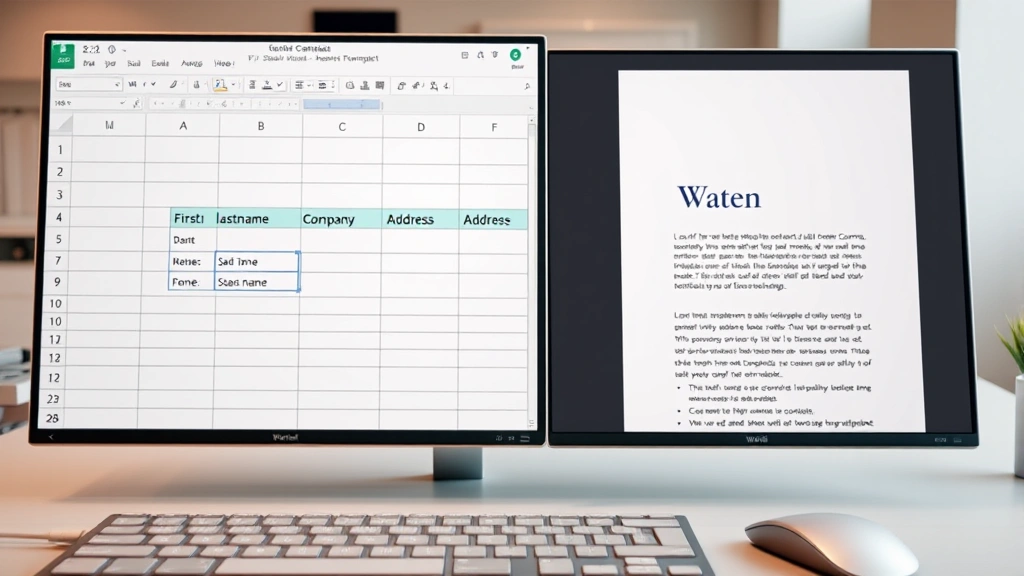
- Headers in the first row. These become your merge field names. Use clear labels like “FirstName,” “LastName,” “Company,” “Address,” “City,” “State,” “ZipCode.” No spaces or special characters in headers—Word gets confused.
- One record per row. Each person or entity gets one row. Simple as that.
- Consistent data formatting. Dates should all be formatted the same way. Numbers should be clean. If you’ve got phone numbers, make sure they’re all in the same format (all with dashes, all with parentheses, or all raw numbers).
- No blank rows between data. Blank rows break the merge. Delete them. Same goes for extra columns you’re not using—clean them out.
If your data is messy, take 15 minutes to clean it up now. You might need to use Excel’s text-to-columns feature or formulas to separate names properly. We’ve got a full guide on how to separate names in Excel if your “FirstName LastName” data is all jammed together. Similarly, if you need to reorganize columns, check out how to move columns in Excel.
Once your data is clean, save the file. Keep it in a simple location—your Desktop or Documents folder works fine. You’ll reference it in Word, so remember where it lives.
Pro Tip: Before you start the mail merge, do a quick audit. Print out a few rows and verify the data is accurate. Typos in your source data will replicate across every single merged document. Catch them now.
Set Up Your Word Document Template
Your Word template is where the magic happens. This is the document that will be repeated for each record in your Excel file, with personalized data inserted.
Create your template like this:
- Open a blank Word document.
- Design your letter, invoice, or form exactly as you want it to appear. Include your letterhead, signature block, standard text—everything that stays the same across all copies.
- Leave space where the personalized data will go. For example, instead of writing “Dear John,” you’ll write “Dear [FirstName],” and Word will swap in the actual name later.
- Don’t insert the merge fields yet. We’ll do that in the next section. For now, just get the layout and static text right.
- Save this document. Give it a clear name like “Mail Merge Template – Invoice” or “Mail Merge Template – Letter.” Save it as a .docx file.
Think of this template like a mold. The mold stays the same, but the specific details change for each cast. Your Word document is that mold.
If you’re creating labels instead of letters, you might want to check our guide on how to create labels in Word to format your template correctly for mailing labels.
Connect Excel to Word
This is where you tell Word, “Hey, grab the data from that Excel file.”
Here’s the step-by-step:
- With your template open in Word, go to the Mailings tab in the ribbon. (If you don’t see it, you might be in Outline or another view—switch to Normal view.)
- Click Start Mail Merge. A dropdown menu appears.
- Select Letters (or whatever format you’re doing—Labels, Envelopes, etc.). This tells Word what kind of merge you’re running.
- Now click Select Recipients. Another dropdown appears.
- Choose Use an Existing List.
- A file browser opens. Navigate to your Excel file and select it. Click Open.
- A dialog box appears asking which sheet you want to use. If your data is on “Sheet1,” select it. If you’ve named your sheet something else (like “Contacts”), select that. Click OK.
- Another dialog pops up showing your data. This is your chance to verify Word found your headers correctly. If it looks right, click OK again.
Congratulations. Your Excel file is now connected to Word. You should see a small envelope icon next to your document name at the top of the window, indicating that this is a mail merge document.
If Word doesn’t find your headers correctly, it’s usually because your Excel headers have spaces, special characters, or aren’t in the first row. Go back to Excel, fix it, save, and try again.
Insert Merge Fields
Now you tell Word exactly where to put each piece of data from your Excel file. This is where the personalization happens.
Here’s how:
- In your Word template, click where you want the first piece of personalized data to go. For example, click right after “Dear ” in your greeting.
- Go to the Mailings tab and click Insert Merge Field. A dropdown list shows all the headers from your Excel file.
- Click the field you want. Let’s say you click “FirstName.” Word inserts something that looks like this:
<<FirstName>> - Repeat this for every piece of personalized data in your document. Address block? Insert the Address field. City? Insert the City field. You get the idea.
After you insert a merge field, you can type normally around it. “Dear <<FirstName>>,” works perfectly. “<<FirstName>> <<LastName>>,” if you want the full name. The merge fields behave like text—you can delete them, rearrange them, or add more as needed.
Safety Warning: Don’t manually type the merge field syntax like <<FirstName>>. Always use the Insert Merge Field button. If you type it manually and make a typo, Word won’t recognize it, and your data won’t populate.
For more complex data manipulation—like combining two columns or rearranging your data structure—you might want to revisit your Excel file. Our guide on how to combine 2 columns in Excel can help if you need to merge FirstName and LastName into a single field before the mail merge.
Preview and Test Your Merge
Before you generate 500 documents, take a breath and check your work. Word has a preview feature that shows you exactly what the merged documents will look like.
Preview your merge:
- Go to the Mailings tab.
- Click Preview Results. Your template now shows actual data from your Excel file instead of the merge field codes.
- Use the arrow buttons next to “Preview Results” to flip through different records. Check 5–10 of them. Look for typos, formatting issues, missing data, or weird spacing.
- If something looks wrong, click Preview Results again to toggle back to the merge field view. Edit your template or go back to Excel to fix the data.
This step catches 90% of problems before they become catastrophes. A customer receiving a letter addressed to “Dear ,” (because their first name is blank) is embarrassing. Catch it here.
If you notice that some records have incomplete data or formatting issues, you might need to go back to Excel and add missing information or adjust the data structure. Sometimes you’ll realize you need an extra column you didn’t think of initially—that’s fine. Add it, save the Excel file, and Word will recognize it the next time you refresh the data connection.
Complete the Mail Merge
Once your preview looks good, you’re ready to generate all your merged documents. Word gives you two main options here.
Option 1: Merge to a New Document
This creates one giant Word file with all your merged documents stacked together. It’s useful if you want to review everything before printing or sending.
- Go to Mailings → Finish & Merge → Merge to New Document.
- A dialog box asks if you want to merge all records or just specific ones. Choose All unless you only want to merge a subset.
- Click OK. Word generates a new document with all your merged records, each starting on a new page (or wherever your page breaks are).
- Save this file if you want to keep it. Name it something like “Merged Letters – 2024.” You can print from here or email individual pages.
Option 2: Merge to Printer
This sends all your documents straight to the printer. It’s faster if you’re just printing and don’t need to review the merged file.
- Go to Mailings → Finish & Merge → Merge to Printer.
- A print dialog opens. Choose your printer, number of copies, and other settings.
- Click OK. Word prints all your merged documents directly.
Honestly, I usually go with Option 1 first, just to double-check everything looks right before committing to paper or email. Takes an extra 30 seconds, but saves headaches.
Common Issues and Fixes
Even when you follow every step perfectly, mail merge can throw curveballs. Here are the most common problems and how to fix them.
Problem: “Word can’t find the data source.”
This usually means you moved or deleted the Excel file after connecting it to Word. Solution: Save your Excel file in a permanent location before starting the mail merge. Don’t move it afterward. If you do move it, go to Mailings → Edit Recipient List → Data Source and re-select the file in its new location.
Problem: Merge fields are showing as blank or incorrect data.
Check your Excel headers. Are they spelled exactly as the merge fields in Word? “FirstName” in Excel but “First_Name” in Word? They won’t match. Also check for leading or trailing spaces in your Excel data. A cell that says ” John” (with a space at the beginning) will merge as ” John” with that awkward space.
Problem: Weird characters or symbols appearing in merged documents.
This usually happens when Excel and Word disagree on character encoding. Save your Excel file as a .csv (comma-separated values) file instead of .xlsx. Then reconnect Word to the .csv version. Often solves the problem instantly. According to Microsoft’s official documentation, this is a known compatibility issue.
Problem: Extra spaces or line breaks in the merged output.
If your Excel data has trailing spaces or your template has extra blank lines, they’ll show up in the merge. Go back to Excel and trim your data. In Word, remove extra blank lines from your template. Use Find & Replace (Ctrl+H) to search for paragraph marks if you’re not sure where the extra breaks are.
Problem: “Error! Not a valid filename” message.
Your Excel file path is too long or contains special characters. Move the file to a simpler location (like your Desktop) with a simpler name (like “Contacts.xlsx” instead of “2024 Q1 Marketing Campaign – Updated Final FINAL.xlsx”). Reconnect Word to the file.
Pro Tip: Always keep a backup copy of your original Excel file and your Word template. If something goes sideways, you can start fresh without losing your data.
Advanced Tips for Professional Results
Once you’ve nailed the basics, here are some tricks that separate amateur mail merges from professional ones.
Use Conditional Fields
Word lets you insert “if” logic into your merge. For example, “If the customer is from California, include this paragraph. If they’re from Texas, include this different paragraph.” Go to Mailings → Rules → If…Then…Else to set this up. It’s powerful for customizing letters beyond just swapping names.
Merge Address Blocks Professionally
Instead of manually inserting FirstName, LastName, Address, City, State, ZipCode as separate fields, use the Address Block button. It formats the address properly and handles missing data gracefully. Go to Mailings → Address Block and let Word do the heavy lifting.
Create a Greeting Line
Similarly, use Greeting Line instead of manually typing “Dear <<FirstName>>.” It handles edge cases (like when FirstName is blank) and formats the greeting professionally.
Filter Your Data
If you only want to merge certain records—say, customers in California—use Edit Recipient List to filter. Click the dropdown arrow next to a column header and select which values to include. This way, you generate only the documents you need.
Export to PDF for Email Distribution
After merging to a new document, save it as a PDF. Then you can email the PDF to recipients, print it, or archive it. PDFs are more secure and universally readable than Word docs.
For more advanced formatting and document customization, check out Family Handyman’s guide to using Word styles—the principles apply to mail merge templates too.
If you’re doing something more complex like creating checkboxes in your merged documents, our guide on how to add checkboxes in Word can help you layer that functionality into your template.
Frequently Asked Questions
Can I mail merge from Google Sheets instead of Excel?
– Yes, but it’s a bit more involved. Download your Google Sheet as an .xlsx file, then follow the same steps. Alternatively, use Google Docs’ built-in mail merge feature, which works natively with Google Sheets. If you’re already in the Microsoft ecosystem, exporting to Excel and using Word is usually simpler.
What if I have thousands of records? Will Word slow down?
– Word can handle thousands of records, but the preview and merge process will be slower. If you’re merging 10,000+ documents, consider breaking it into batches. Merge 2,000 at a time, save each batch, then combine them. It’s less elegant but more stable.
Can I mail merge directly to email?
– Not natively in Word. You’ll need to merge to a new document, then use a third-party tool or script to send individual emails. Alternatively, export the merged document to PDF and use a mail merge service like Mailchimp or similar platforms designed for email campaigns.
How do I handle missing data in my Excel file?
– Word will simply leave that field blank. If you want to show “N/A” or a default value instead, use the If…Then…Else rule to insert placeholder text when a field is empty. Or, go back to Excel and fill in the blanks before the merge.
Can I edit the merged documents after creating them?
– Yes. When you merge to a new document, you get a regular Word file. You can edit it like any other document. However, if you merge again from the template, those edits will be overwritten. Always save your merged output separately from your template.
What’s the difference between merging to a new document vs. merging to printer?
– Merge to New Document creates a single Word file with all your merged records. You can review, edit, and print it later. Merge to Printer sends everything directly to your printer immediately. Use New Document for review; use Printer for high-volume printing when you’re confident everything is correct.
Do I need to reconnect my Excel file every time I open the Word template?
– No. Once you’ve connected the Excel file, Word remembers the connection. The next time you open the template, Word will ask if you want to update the data from the linked Excel file. Click “Yes” to refresh with the latest data. If you moved the Excel file, you’ll need to reconnect manually.
Can I use multiple Excel files in a single mail merge?
– Not directly. Word connects to one data source at a time. If you need data from multiple files, combine them into a single Excel file first. Use vlookup or other Excel formulas to pull data from other sheets if needed. Alternatively, copy and paste data from multiple sources into one sheet.
Mail merge is one of those skills that feels intimidating until you do it once. After that, it becomes second nature. You’ll start looking for excuses to use it because it saves so much time. The key is getting your Excel data clean upfront and testing your template thoroughly before you go live. Do that, and you’ll generate professional, personalized documents in a fraction of the time it would take manually.
For additional Microsoft Office tips and tricks, Microsoft’s official Office support site has detailed documentation on mail merge and related features.


