
Your smoke alarm is chirping at 2 AM. Again. That annoying beep-beep-beep every 30 seconds is your detector screaming for a fresh battery. Here’s the thing: knowing how to change smoke alarm battery correctly takes five minutes tops, but most people ignore it for weeks because they’re unsure about the process or worried they’ll mess something up.
Let me be straight with you—this is one of the easiest home maintenance tasks you can do, and it’s also one of the most critical. A dead smoke alarm is basically a decoration on your ceiling. In a fire, that dead battery could cost you everything.
This guide walks you through every step, from identifying your alarm type to installing the right battery and testing it. I’ll also cover the mistakes people make, how often you should really change batteries, and why some alarms need different approaches than others.
Why Your Smoke Alarm Battery Matters
Think of your smoke alarm like a fire extinguisher—useless if it’s not ready to go. According to the National Fire Protection Association (NFPA), roughly 1 in 4 homes have non-functional smoke alarms, and dead or missing batteries are the leading cause.
Here’s what happens when your battery dies: the alarm can’t detect smoke. It doesn’t matter if the sensor is perfect, the wiring is flawless, or the alarm cost $50. A dead battery means zero protection. That chirp you’re hearing? That’s your alarm literally begging you to fix it before a real emergency happens.
Safety Warning: Never ignore a chirping smoke alarm. That sound is designed to annoy you into action. It means the battery voltage has dropped below the threshold needed for reliable operation. Replace it immediately.
Most fire deaths happen at night when people are asleep and can’t detect smoke visually. Your smoke alarm is your early warning system. It’s the difference between waking up and evacuating safely versus waking up to flames already in your room.
Types of Smoke Alarms and Their Batteries
Not all smoke alarms are created equal, and neither are their batteries. Understanding what type you have is the first step in how to change smoke alarm battery correctly.
Ionization Alarms (Most Common)
These are the standard alarms in most homes. They use a small radioactive source to ionize air particles and detect smoke. Ionization alarms typically use 9-volt batteries (the rectangular ones) or AA/AAA batteries depending on the model.
Photoelectric Alarms
These use a light beam and sensor to detect smoke particles. They’re better at detecting smoldering fires that produce lots of smoke but little flame. Photoelectric alarms also use 9V or AA/AAA batteries.
Dual-Sensor Alarms
These combine both technologies and offer the best protection. They also use standard 9V or AA/AAA batteries.
Hardwired Alarms with Battery Backup
These plug into your home’s electrical system but have a backup battery (usually 9V) for power outages. The battery change process is slightly different here—we’ll cover that below.
Before you buy a replacement battery, check your alarm’s model number (usually on the back or bottom). The manual or a quick Google search will tell you exactly which battery type you need. Pro tip: buy a two-pack. When one dies, you’ll have a backup ready to go, and you won’t need to scramble at midnight.
Tools and Materials You’ll Need
Here’s what’s genuinely required—and I mean actually required, not the 47-item list some websites will try to sell you:
- One replacement battery (9V, AA, or AAA depending on your model)
- A step ladder or sturdy chair (unless your alarm is at shoulder height)
- Optional: A damp cloth to wipe dust off the alarm while you’re up there
That’s it. Seriously. You don’t need a screwdriver, a flashlight, or special tools. Most modern smoke alarms have a simple twist-off or snap-off battery door.
If your alarm is hardwired and you need to replace the backup battery, you might need a screwdriver to remove the alarm from the ceiling, but that’s still minimal.
Step-by-Step: How to Change Smoke Alarm Battery
For Standard Battery-Powered Alarms
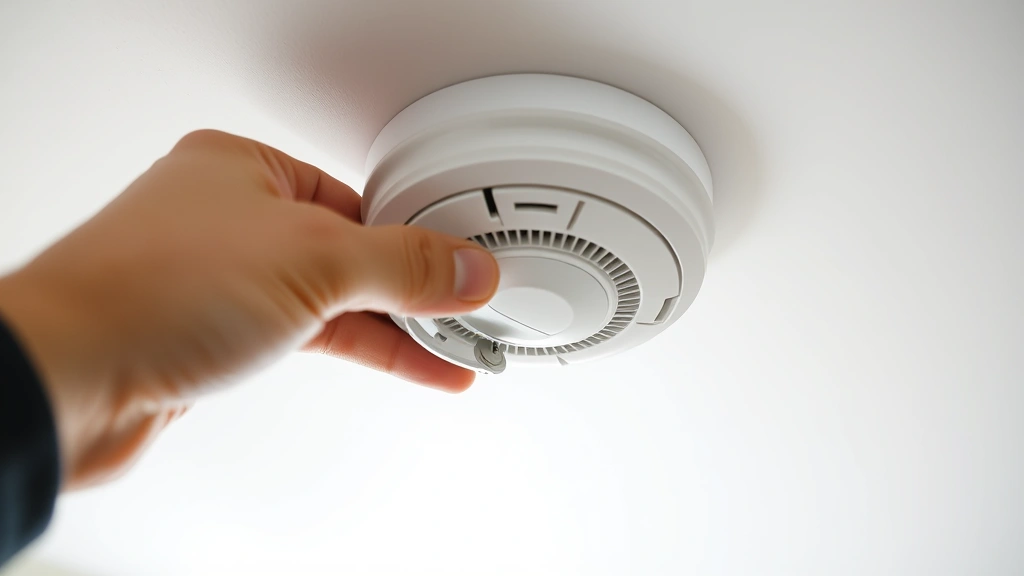
- Locate the alarm. Look at your ceiling. If you have multiple alarms (you should—at least one on each floor and one in each bedroom), start with the one that’s chirping.
- Get safe access. Place your ladder directly under the alarm. Don’t reach or stretch. If the alarm is in a stairwell, position the ladder on the landing, not on the stairs themselves. Safety first—a fall is worse than a dead battery.
- Remove the alarm from the ceiling. Most alarms twist counterclockwise. Gently rotate the alarm body until it separates from the mounting bracket. Some alarms have a release button on the bracket—check the side or back. Don’t yank. If it’s stuck, it might be painted over. Gently work it loose.
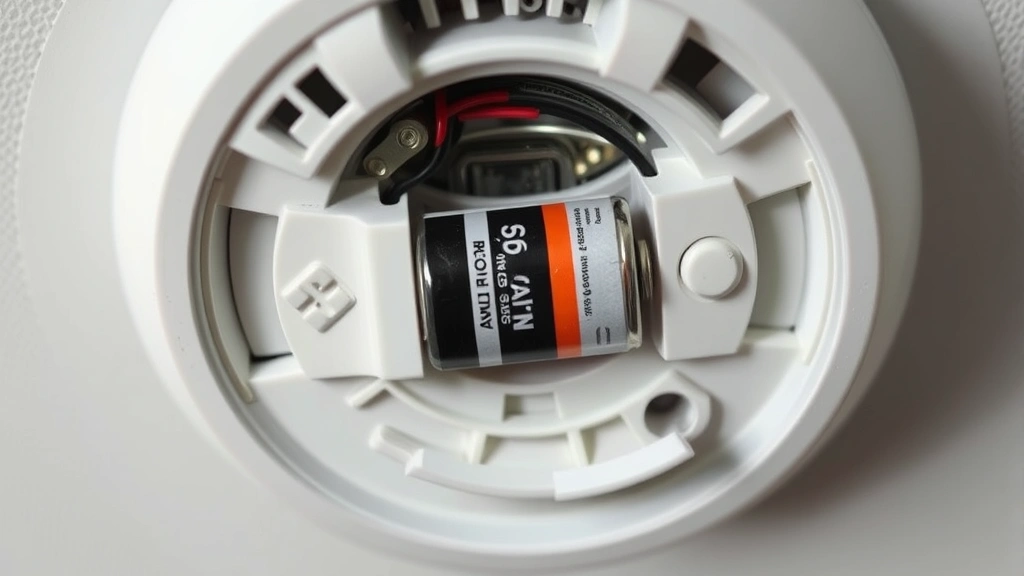
- Locate the battery compartment. Once the alarm is in your hands, look for a battery door or cover. This is usually on the back or bottom and marked with a battery symbol.
- Open the battery door. Most doors slide or snap open. Again, gentle pressure. You’re not opening a can of paint.
- Remove the old battery. Note which direction it’s oriented—positive (+) side up or down. This matters for the new battery.
- Insert the new battery. Match the orientation of the old battery. The positive side should face the same direction. Push it in until it clicks or sits snugly.
- Close the battery door. Slide or snap it shut. You should hear a click if it’s secure.
- Reinstall the alarm. Twist the alarm body clockwise onto the mounting bracket until it’s tight. It should sit flush against the ceiling.
- Test the alarm. Press and hold the test button (usually in the center of the alarm) for 3-5 seconds. The alarm should sound loudly. If it doesn’t, the battery might be in backwards or defective. Try again.
For Hardwired Alarms with Battery Backup
These are trickier because you’re dealing with electrical connections, but it’s still manageable:
- Turn off power at the breaker. Find your home’s electrical panel and flip the breaker that controls the alarm circuit. If you’re unsure which one, turn off the main breaker as a safety measure. You’re working with electricity—don’t skip this step.
- Remove the alarm from the ceiling. There’s usually a release tab or button. Press it and gently pull the alarm away from the mounting bracket. The wires should have enough slack to work with the alarm in your hands.
- Locate the battery compartment. It’s usually on the side or back of the alarm body.
- Disconnect the old battery. There are usually two wire terminals (red and black) connected to the battery. You might need a small screwdriver to loosen the terminal screws. Note which wire connects to which terminal.
- Install the new battery. Connect the red wire to the positive terminal and the black wire to the negative terminal. Tighten the screws firmly but don’t over-tighten—you can crack the plastic.
- Reinstall the alarm. Push the alarm back onto the mounting bracket until it clicks. Turn the breaker back on.
- Test the alarm. Press the test button. It should sound immediately. If it doesn’t, turn off the breaker, check your wire connections, and try again.
Pro Tip: If you’re uncomfortable working with electrical connections, call a licensed electrician. It costs $75–150, but it’s better than creating a fire hazard or getting shocked. There’s no shame in knowing your limits.
Testing Your Alarm After Battery Change
This step is non-negotiable. A silent alarm is worse than no alarm at all because you think you’re protected when you’re not.
After you’ve installed the new battery and reinstalled the alarm, press and hold the test button for 3–5 seconds. The alarm should produce a loud, piercing sound—around 85 decibels, which is roughly as loud as a lawn mower. If you have family in the house, warn them first. Nothing like sending your spouse into panic mode because they think there’s a fire.
The alarm should stay loud for the entire time you’re holding the button. If it’s weak, intermittent, or doesn’t sound at all, the battery might be:
- Installed backwards (positive side facing the wrong direction)
- Defective (try a different battery)
- Not making full contact (remove and reseat it)
If none of those fixes work, your alarm might be at the end of its life. Most smoke alarms last 8–10 years. If yours is older than that, replacement (not just the battery) is wise. Check the manufacture date on the back of the alarm.
Common Mistakes People Make
After talking to hundreds of homeowners and fire safety experts, here are the mistakes that keep happening:
Installing the Battery Backwards
This is the #1 culprit. The positive (+) side must face the correct direction. If you installed the old battery with the positive side up, the new battery goes in the same way. It’s a simple rule, but people rush and flip it. Always double-check before closing the battery door.
Forgetting to Test After Installation
You’d be shocked how many people install a new battery, reinstall the alarm, and never test it. Then six months later, they discover it’s not working. Test immediately. It takes 10 seconds.
Buying the Wrong Battery Type
Your alarm needs a specific battery. A 9V alarm won’t work with AA batteries, and vice versa. Check your model number before you buy. Don’t guess.
Ignoring Hardwired Alarms
Many people assume hardwired alarms don’t need battery changes because they’re plugged in. Wrong. The backup battery still dies and needs replacement. Without it, a power outage leaves you unprotected.
Not Replacing All Alarms on Schedule
If one alarm needs a battery, odds are good the others do too (especially if they’re the same age). Replace all of them at the same time. Mark your calendar so you don’t forget next year.
Using Cheap or Expired Batteries
A dollar-store battery might work for a TV remote, but your smoke alarm deserves quality. Buy name-brand batteries (Duracell, Energizer) from a reputable source. Check the expiration date. Old batteries lose charge faster.
Battery Maintenance Schedule
Here’s when to change your smoke alarm batteries:
Standard Recommendation
Replace batteries twice a year. The easiest way to remember: change them when you change your clocks for daylight saving time (spring and fall). That’s a built-in reminder.
If You Have Hardwired Alarms
Backup batteries should be replaced annually, usually in the fall before the heating season starts (when fires are more common).
If Your Alarm is Chirping
Don’t wait for the scheduled time. Replace it immediately. That chirp means the battery voltage is too low for reliable operation.
After a Power Outage
If your area experiences a prolonged power outage, check hardwired alarms after power is restored. The backup battery might have been drained.
Here’s a real-world tip: set a phone reminder for March 15 and September 15. When the reminder pops up, spend 15 minutes replacing all your alarm batteries. It’s a small investment of time for massive peace of mind. According to Ready.gov, working smoke alarms cut the risk of dying in a reported fire in half.
Frequently Asked Questions
How long does a smoke alarm battery last?
– Most 9V and AA/AAA batteries last about 1 year in a smoke alarm, though some premium batteries claim 5-year lifespans. The problem: you won’t know when it’s dying until it chirps. That’s why twice-yearly replacement on a schedule is safer than waiting for the alarm to tell you. It’s like changing your car’s oil—you don’t wait until the engine seizes.
Can I use rechargeable batteries in my smoke alarm?
– Generally, no. Rechargeable batteries have a different voltage curve and can fail unpredictably. Stick with alkaline batteries (standard disposable ones). If your alarm specifically says it’s compatible with rechargeables, fine, but check the manual first. Most manufacturers recommend against it.
What if my alarm won’t stop chirping after I change the battery?
– First, make sure the battery is installed correctly (positive side facing the right direction) and fully seated. Second, try a different battery—the one you installed might be defective. Third, press the test button a few times to see if that resets the alarm. If it still chirps after all that, the alarm itself might be failing. Alarms typically last 8–10 years. If yours is older, replacement is the answer.
Do I need to turn off power to change a battery in a hardwired alarm?
– Yes, absolutely. Even though you’re only touching the battery (not the wires), it’s safer to kill power at the breaker. This prevents accidental electrical shock and protects your alarm from power surges while you’re working on it. It takes 30 seconds and eliminates risk.
Can I use a different battery type than what the manual specifies?
– No. Your alarm is designed for a specific battery type and voltage. Using the wrong type can cause the alarm to malfunction or not work at all. If your manual says 9V, buy 9V. If it says AA, buy AA. There’s no substitution here.
How do I know if my smoke alarm is hardwired or battery-powered?
– Look at the mounting bracket on the ceiling. If there are visible wires running into it, it’s hardwired (though it might also have a backup battery). If there are no wires, it’s battery-powered only. You can also check the back of the alarm itself—hardwired alarms usually have wire terminals visible.
What should I do with the old battery?
– Don’t throw it in the trash. Batteries contain chemicals and metals that belong in a recycling program. Most retailers that sell batteries (Best Buy, Home Depot, Lowe’s) have battery recycling programs. Drop your old battery off there for free. Some municipalities also have hazardous waste collection days. Check your local government’s website.
Is it normal for a smoke alarm to chirp after I change the battery?
– A single chirp or beep after you change the battery is normal—it’s the alarm confirming the battery is installed. If it continues chirping every 30 seconds after that, the battery isn’t making good contact or is installed backwards. Remove it, check the orientation, and reinstall.

Do I need different batteries for different types of smoke alarms?
– Yes. Ionization, photoelectric, and dual-sensor alarms can all use different battery types depending on the model. Check your specific alarm’s manual or the model number to confirm. When in doubt, call the manufacturer or check their website. A 5-minute phone call beats buying the wrong battery.
Can I test my smoke alarm too often?
– No. Test it as often as you want. The test button is designed for this. Some people test monthly just to make sure it’s working. That’s perfectly fine and actually a good habit. It only takes 10 seconds and gives you confidence that your alarm is ready.


