

We’ve all been there. You’re working on a document, editing a photo, or organizing files on your Mac when suddenly—whoops—you delete something important, make a formatting change you hate, or accidentally overwrite text you needed. Your heart sinks. But here’s the thing: knowing how to undo on Mac is one of the most powerful skills you can develop to save yourself from these moments of panic.
The undo command on Mac is deceptively simple on the surface, but there’s way more to it than just hitting Command+Z once and hoping for the best. Whether you’re using Apple’s native apps, Adobe Creative Suite, Microsoft Office, or third-party software, understanding the full range of undo capabilities—including redo, undo history, and app-specific behaviors—will transform how you work. You’ll recover from mistakes faster, experiment more confidently, and spend less time redoing work you thought was lost.
This guide breaks down everything you need to know about undoing actions on Mac, from the basics to advanced techniques that’ll make you look like a power user.
The Basic Undo Command: Command+Z
Let’s start with the foundation. On Mac, the universal keyboard shortcut for undo is Command+Z. That’s it. One keystroke, and your last action reverses itself. It works in almost every Mac application—TextEdit, Word, Pages, Photoshop, Slack, Gmail, you name it.
Here’s why this matters: Command+Z isn’t just a safety net. It’s permission to experiment. Once you internalize that you can always undo, you become braver with your edits. You’ll try that risky formatting change, attempt a complex edit, or reorganize your document structure without fear. The undo command gives you freedom.
The mechanics are straightforward. When you perform an action—typing text, deleting a paragraph, applying a filter to a photo—your Mac stores that action in memory. Command+Z retrieves that stored action and reverses it. The app essentially says, “Okay, let’s pretend that didn’t happen.”
But here’s where people get confused: the undo command only works within a single session. If you close an app and reopen it, your undo history is gone. It’s like closing a book and forgetting what page you were on. This is why saving your work frequently matters—it’s your safety checkpoint.
Different applications handle undo slightly differently. Some apps, like Apple’s native apps, integrate undo deeply into their design. Others treat it more casually. But the Command+Z shortcut is universal enough that it’s worth making it muscle memory.
Redo and Redo Undo on Mac
Here’s where things get interesting. After you undo an action, you might think, “Wait, actually I liked that change.” That’s where redo comes in. On Mac, the keyboard shortcut for redo is Command+Shift+Z or, in some applications, Command+Y. (Command+Y is less common these days, but older apps sometimes use it.)
Think of undo and redo as a two-way street. You step backward with Command+Z, then step forward with Command+Shift+Z. But—and this is critical—the moment you perform a new action after undoing, your redo history is erased. It’s like choosing a different path on that two-way street; you can’t go back to the old route anymore.
This trips up a lot of people. You undo a deletion (Command+Z), then accidentally type something new, and suddenly you can’t redo the deletion you just undid. The new action replaces your redo option. It’s frustrating, but it’s how most apps work. The solution? Be intentional about what you do after undoing. If you undo something, immediately redo it with Command+Shift+Z, or don’t do anything else until you’re sure.
Some advanced applications, like Adobe Photoshop, offer a “non-linear undo” feature that lets you branch off into multiple undo paths. But that’s not standard Mac behavior, and most users won’t encounter it.
Accessing Undo History and Multiple Steps
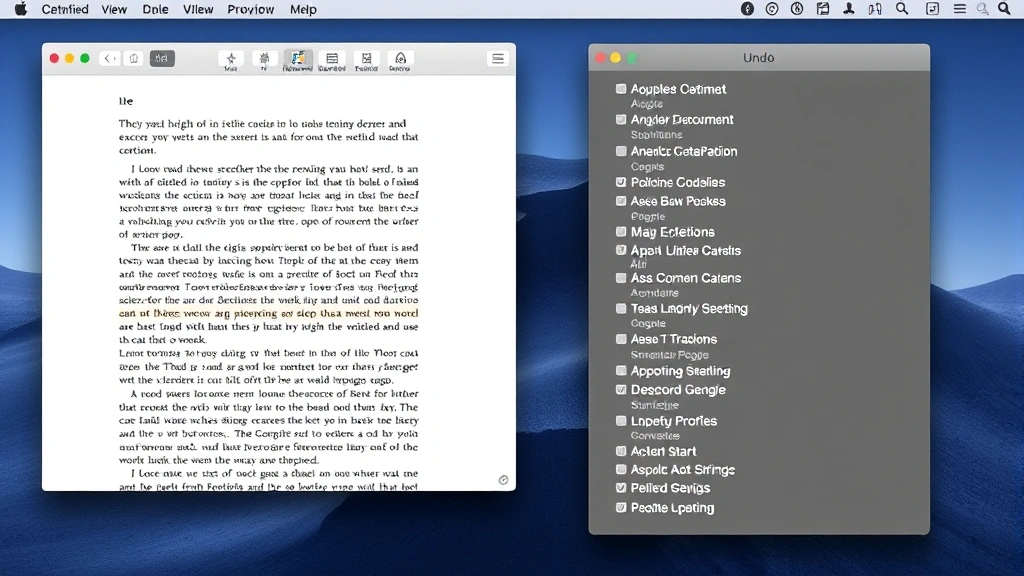
If you need to undo more than one action, you don’t have to press Command+Z repeatedly (though you can). Many Mac applications offer an undo history or undo menu that shows you multiple steps back. This is a game-changer when you want to revert several actions at once.
To access undo history in most apps, look in the Edit menu. You’ll often see an option like “Undo [Action Name]” at the top. If you click and hold on that menu item, or if the app offers a dedicated undo history panel, you can see a list of your recent actions and jump back to any point.
In Adobe Creative Suite (Photoshop, Illustrator, InDesign), there’s a dedicated History panel that shows every action you’ve performed, with a slider you can drag backward to any point. It’s incredibly powerful. In Microsoft Office for Mac (Word, Excel, PowerPoint), you can access the undo history by clicking the small arrow next to the undo button in the toolbar.
Here’s a practical example: You’re writing a document, and you make five edits over the course of an hour. Then you realize that three edits ago, you deleted a paragraph you actually needed. Instead of undoing five times and losing your recent work, you can jump directly to the state before that deletion. You recover what you need without sacrificing everything else.
The limitation? Undo history is app-specific and session-specific. Close the app, and it’s gone. This is why Time Machine, Apple’s backup system, is so valuable for Mac users. It gives you a safety net beyond a single session.
App-Specific Undo Behaviors
Not all Mac apps handle undo the same way. Understanding these differences prevents frustration and helps you work smarter within each application.
- Apple’s Native Apps (Pages, Numbers, Keynote, Mail): These apps integrate undo deeply and offer robust undo history. Pages and Keynote even show you a visual timeline of changes. The undo behavior is consistent and predictable.
- Microsoft Office for Mac (Word, Excel, PowerPoint): Office apps support undo with a toolbar button and keyboard shortcut. The undo history is decent but not as visual as Apple’s apps. Word, in particular, has some quirks—sometimes undo behaves differently depending on whether you’re in editing mode or reviewing mode.
- Adobe Creative Suite (Photoshop, Illustrator, InDesign): These apps offer the most sophisticated undo systems, including the History panel mentioned earlier. You can set the number of undo steps (default is 20, but you can increase it). This is crucial for creative work where you might need to revert many steps.
- Web-Based Apps (Google Docs, Google Sheets, Figma, Canva): These apps often have limited undo history because they’re constantly saving changes to the cloud. Google Docs, for example, shows you a version history instead of traditional undo. Figma offers undo but caps it at a certain number of steps.
- Terminal and Code Editors: Command-line tools don’t have undo in the traditional sense. Code editors like VS Code or Sublime Text do, and they’re excellent. But if you’re working in Terminal, there’s no undo—which is why you should be careful with destructive commands.
The takeaway: Check the Edit menu or preferences of any new app to understand how undo works. Don’t assume it behaves like your last app. A few minutes of exploration saves hours of headaches.
When Undo Doesn’t Work: Limitations and Workarounds
Undo is powerful, but it has hard limits. Understanding these prevents you from relying on it for situations where it can’t help.
Undo doesn’t work after you close and reopen an app. This is the biggest limitation. You can undo within a session, but once you quit the application, your undo history is erased. If you close Word without saving and reopen it, you can’t undo your unsaved changes. This is why the “Save” command is your best friend. Save frequently, and you create checkpoints you can return to.
Undo doesn’t reverse file deletions (usually). If you delete a file in Finder and empty the Trash, undo won’t bring it back. However, if you delete a file and immediately press Command+Z before doing anything else, you might recover it. But don’t count on it. For permanent recovery, you need Time Machine or third-party recovery software.
Some actions can’t be undone. Restarting your Mac, for example, can’t be undone. Shutting down your computer, logging out, or switching users can’t be undone. These are system-level actions that go beyond any single app’s undo capability.
Cloud-based apps have different undo rules. Google Docs doesn’t have traditional undo; it has version history. If you delete text in Google Docs and refresh the page, you can still recover it from version history, but the mechanism is different. Understand the app’s backup system instead of relying on undo.
Undo history is limited by available memory. If you’re working on a massive Photoshop file with hundreds of layers, your Mac might limit the undo history to conserve memory. You can adjust this in preferences, but there’s always a practical limit.
Workaround strategy: Don’t rely solely on undo. Use a combination of approaches:
- Save your work frequently (Command+S)
- Use version control if you’re coding (Git, GitHub)
- Enable Time Machine for system-wide backups
- For creative work, save multiple versions with different names (“Document_v1”, “Document_v2”)
- Use cloud backup services for important files
Keyboard Shortcuts and Efficiency Tips
Mastering a few keyboard shortcuts makes you dramatically faster at undoing and redoing. Here’s your cheat sheet:
- Command+Z: Undo the last action
- Command+Shift+Z: Redo the last undone action (most apps)
- Command+Y: Redo (older apps, less common)
- Command+S: Save (not undo, but essential for protecting your work)
- Command+Option+S: Save As (create a new version)
Pro tip: If you’re doing repetitive work, you can press Command+Z multiple times rapidly to undo several actions in sequence. It’s faster than accessing the undo history menu if you only need to go back a few steps.
Another efficiency trick: In apps like Word or Pages, you can customize the toolbar to add an undo button with a dropdown menu. This gives you one-click access to undo history without diving into the Edit menu. Right-click the toolbar and select “Customize Toolbar” to add it.
File Recovery When Undo Isn’t Available
Sometimes you need to recover a file, but undo isn’t an option. Maybe you closed the app without saving, or you didn’t realize you needed something until days later. Here’s how to recover files on Mac:
Time Machine: If you have Time Machine enabled (which you should), you can recover previous versions of any file. Open Finder, navigate to the folder where the file was, and click the Time Machine icon in the menu bar. You’ll see a timeline of your files. Select the version you want and click Restore. This is your most reliable recovery method. Apple’s Time Machine documentation explains the full process.
Version History (for cloud apps): Google Docs, Dropbox, OneDrive, and iCloud Drive all maintain version histories. In Google Docs, click File > Version History > See All Versions. In Dropbox or OneDrive, right-click the file and look for a “Version History” or “Restore” option.
Trash (short-term recovery): If you deleted a file recently, check your Trash. Open Finder, click Trash in the sidebar, find your file, right-click it, and select “Put Back.” Trash is your first line of defense for accidental deletions.
Third-Party Recovery Software: If you’ve permanently deleted a file and don’t have Time Machine, third-party tools like Stellar Data Recovery or DiskWarrior can sometimes recover deleted files from your hard drive. These work best if you act quickly and haven’t written new data over the deleted file.
Auto-Recovery and Backup Files: Some apps automatically save backup versions of your work. Microsoft Office, for example, creates temporary backup files. If Word crashes, it often asks you to recover your document when you reopen it. Check your app’s preferences to enable auto-recovery if it’s available.
The lesson here: Undo is immediate and convenient, but it’s not your only safety net. A layered approach to backup and recovery—Time Machine, cloud sync, manual saves, and version history—protects you from virtually any data loss scenario.
Frequently Asked Questions
What’s the keyboard shortcut to undo on Mac?
– The keyboard shortcut to undo on Mac is Command+Z. This works in almost all Mac applications. To redo after undoing, use Command+Shift+Z (or sometimes Command+Y in older apps).
Can I undo after closing an app?
– No, undo history is lost when you close an application. If you close Word without saving, you can’t undo your unsaved changes by reopening Word. This is why saving your work frequently is critical. However, you can recover previous versions of files using Time Machine or version history features in cloud apps.
How many times can I undo on Mac?
– The number of undo steps depends on the application. Most apps allow 20-30 undo steps, but some (like Adobe Photoshop) let you increase this in preferences. Web-based apps often have more limited undo history. Check your specific app’s settings to see how many undo steps are available.
Why doesn’t undo work in my Mac app?
– Several reasons: (1) The app might not support undo for that specific action, (2) you might have closed the app or switched documents, (3) the undo history might have been cleared, or (4) the app might have crashed. Try restarting the app or checking the Edit menu to see if undo is available. If an app frequently doesn’t support undo, consider using a different app.
Is undo the same as Trash?
– No. Undo reverses your last action within an app (like deleting text). Trash is where deleted files go in Finder. If you delete a file in Finder, undo might recover it if you act immediately, but once you empty Trash, the file is gone (unless you use Time Machine or recovery software). They’re related but different systems.
Can I undo a file deletion?
– It depends on timing and method. If you delete a file in Finder and immediately press Command+Z, it might recover the file. If you’ve already emptied Trash, you’ll need Time Machine, version history, or third-party recovery software. For important files, use Time Machine as your safety net rather than relying on undo.
What’s the difference between undo and version history?
– Undo reverses your last action within the current session of an app. Version history (available in cloud apps and Time Machine) saves snapshots of your entire file at different points in time. Version history persists after you close the app, while undo doesn’t. For maximum protection, use both: undo for immediate corrections, version history for long-term recovery.
How do I access undo history in Word for Mac?
– Click the undo button (the curved arrow) in the toolbar, then click the small dropdown arrow next to it. This shows your undo history. You can also use the Edit menu and look for “Undo” options. In newer versions of Word, you might see a timeline view of your document’s changes.

Does undo work in Google Docs?
– Google Docs doesn’t have traditional undo in the Command+Z sense (though the keyboard shortcut might work). Instead, Google Docs uses Version History. Click File > Version History > See All Versions to view and restore previous versions of your document. This is actually more powerful than traditional undo because versions are saved permanently.
Can I undo a save?
– No, saving a file can’t be undone. Once you save, those changes are permanent (unless you use version history or Time Machine to revert to a previous version). This is why you should save frequently but intentionally. If you save something you didn’t mean to, your best option is version history or Time Machine.


