
Section breaks in Microsoft Word are like invisible walls in your document. They control page orientation, margins, headers, footers, and page numbering independently. Sounds useful, right? The problem: they’re easy to create accidentally, and when you try to delete them, Word can act like you’re trying to defuse a bomb. The good news? Removing a section break in Word is straightforward once you know where to look and what to click.
If you’ve inherited a messy Word document from a colleague, or you’ve been experimenting with formatting and now have random page breaks throwing off your layout, you’re in the right place. This guide walks you through every method to remove section breaks, troubleshoot stubborn ones, and prevent them from sneaking back in.
What Is a Section Break in Word?
Before you remove a section break in Word, you need to understand what it actually does. A section break is a marker that tells Word, “From this point forward, use different formatting rules.” Think of it like a chapter divider in a book where one chapter has different margins than the next.
There are four types of section breaks:
- Next Page: Starts the new section on a new page. Most common.
- Continuous: Starts the new section on the same page (useful for changing column layouts mid-document).
- Even Page: Starts the new section on the next even-numbered page.
- Odd Page: Starts the new section on the next odd-numbered page.
Each section can have its own:
- Page margins
- Page orientation (portrait vs. landscape)
- Header and footer content
- Page numbering
- Column layout
- Line numbering
Section breaks are powerful when intentional (like switching a document to landscape for a table), but they’re formatting nightmares when accidental. The reason? When you delete a section break, the content from that section inherits the formatting of the previous section. If you’re not careful, you can lose custom headers, change margins unexpectedly, or mess up page numbering. That’s why knowing how to remove a section break in Word properly matters.
Step 1: Show Formatting Marks (The Critical First Move)
This is the foundation of everything. You cannot see section breaks in Word unless you turn on formatting marks. Without them, you’re flying blind.
On Windows (Word 2019, 2021, Microsoft 365):
- Press Ctrl + Shift + 8 on your keyboard. (The 8 key, not the numpad.)
- Alternatively, go to the Home tab in the ribbon and click the ¶ (pilcrow) button in the Paragraph section.
- Now you’ll see all hidden formatting marks: spaces (·), tabs (→), paragraph marks (¶), and section breaks.
On Mac (Word 2019, 2021, Microsoft 365):
- Press Cmd + Shift + 8.
- Or go to Word menu → Preferences → View and check “Formatting marks.”
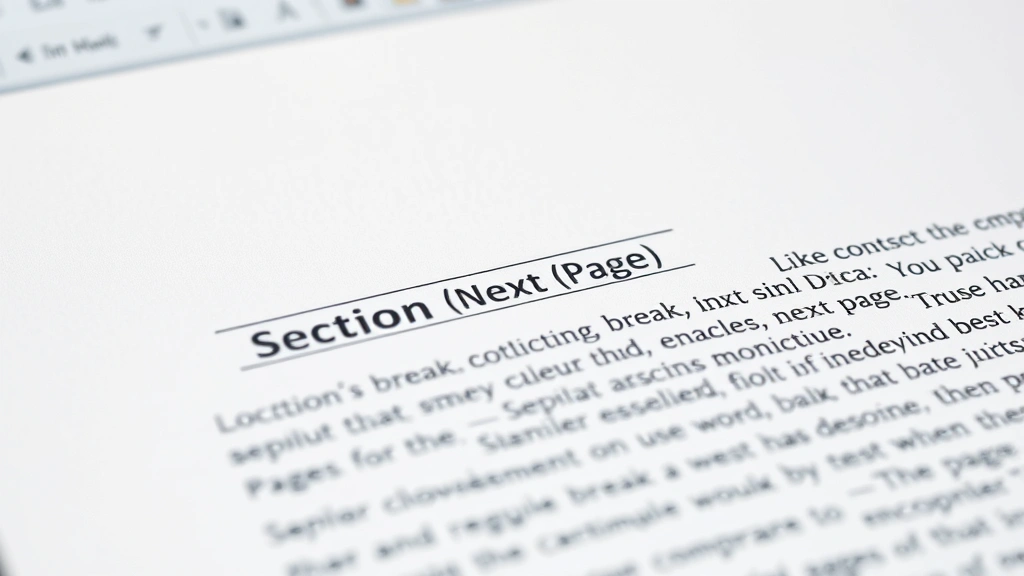
Once you turn on formatting marks, section breaks appear as a double-line with the text “Section Break (Next Page)” or similar. It looks like this: ─────────────── Section Break (Next Page) ───────────────
Pro tip: Leave formatting marks on permanently. I know it looks cluttered at first, but you’ll catch formatting issues way faster. It’s like having X-ray vision for your document.
Step 2: Locate and Delete the Section Break
Now that you can see section breaks, deleting them is dead simple.
Method 1: Direct Deletion (The Easy Way)
- Scroll through your document and find the section break you want to remove.
- Click directly on the section break line to position your cursor there.
- Press Delete or Backspace.
- The section break vanishes, and the content below inherits the formatting from the section above.
That’s it. Seriously. If it were this simple every time, we wouldn’t need this guide. But sometimes Word acts up.
Method 2: Using Find & Replace (For Multiple Section Breaks)
If your document has multiple section breaks you want to nuke, use Find & Replace:
- Press Ctrl + H (Windows) or Cmd + H (Mac) to open Find & Replace.
- Click More Options or Advanced (depending on your Word version).
- Click Special (or Format in some versions).
- Select Section Break from the dropdown.
- Leave the “Replace with” field empty.
- Click Replace All to remove every section break at once.
This is a nuclear option. Use it only when you’re sure you want to remove all section breaks. If you have some you want to keep, stick with Method 1.
Windows vs. Mac Differences (What Actually Changes)
Microsoft Word is mostly the same across Windows and Mac, but section break removal has a few quirks worth knowing.
Windows:
- Keyboard shortcut for formatting marks: Ctrl + Shift + 8
- Find & Replace: Ctrl + H, then look for “Special” button
- Section break appears as a clear double line with label
Mac:
- Keyboard shortcut for formatting marks: Cmd + Shift + 8
- Find & Replace: Cmd + H, then look for “Format” button
- Section break appears the same way but the menu paths are slightly different
- The pilcrow button (¶) is in the same place in the ribbon
The actual deletion process is identical. The differences are just in how you navigate the menus. If you’re switching between Windows and Mac (like when you’re using a work laptop and a personal Mac), just remember: Windows uses Ctrl, Mac uses Cmd. Everything else is the same.
Troubleshooting Stubborn Section Breaks
Sometimes Word refuses to delete a section break. You click Delete, nothing happens. You click Backspace, still nothing. Here’s what’s going on and how to fix it.
Problem 1: The Section Break Won’t Delete Because It’s Protecting Content
If a section has special formatting (like a different header or different page orientation), Word might lock it to prevent accidental deletion. The fix:
- Click inside the section you want to remove (not on the break itself).
- Go to Layout tab (Windows) or Page Layout (Mac).
- Look for Margins, Orientation, or Page Setup.
- Change the formatting back to match the previous section (same margins, same orientation, etc.).
- Now try deleting the section break again.
Problem 2: The Section Break Reappears After Deletion
This usually means the document’s master formatting is fighting you. Try this:
- Delete the section break as normal.
- If it reappears, select all text in that section.
- Go to Layout → Breaks and manually select “No Break” or the appropriate break type.
- Save the document.
Problem 3: Deleting the Section Break Messes Up Formatting
This is the most common issue. When you delete a section break, the content below inherits the formatting of the section above. If the sections had different margins, headers, or page numbering, things get ugly fast. The fix:
- Before deleting, note the formatting of both sections (margins, headers, orientation, page numbering).
- Delete the section break.
- If formatting breaks, use Ctrl + Z (Windows) or Cmd + Z (Mac) to undo.
- Instead, copy the formatting from the section you want to keep and apply it to the section you’re deleting.
- Then delete the section break.
Real talk: Sometimes it’s faster to manually reformat the content than to fight Word’s logic. Copy the content, delete the section break, and reapply formatting manually. It sounds tedious, but it prevents cascading formatting disasters.
Problem 4: You Can’t See the Section Break
Make absolutely sure formatting marks are on. Press Ctrl + Shift + 8 (Windows) or Cmd + Shift + 8 (Mac) again. If you still don’t see it, the “break” might be a page break instead. Page breaks look different (they show as “─────────────── Page Break ───────────────”) and are deleted the same way, but they’re not section breaks. If it’s a page break and you want to remove it, just click and delete. For more on managing pages in Word, check out our guide on how to delete pages in Word.
How to Prevent Unwanted Section Breaks
The best section break is the one you never create by accident. Here’s how to stay safe.
1. Keep Formatting Marks On
Seriously. Leave them on. Once you get used to the visual clutter, you’ll spot accidental section breaks immediately. It’s the single best prevention strategy.
2. Be Careful with the Layout Tab
The Breaks button in the Layout tab is where section breaks come from. If you’re not intentionally inserting a section break, don’t touch it. If you accidentally click it, press Undo immediately.
3. Use Styles Instead of Manual Formatting
New users often create section breaks when they really just want to change formatting for one paragraph. Instead, use paragraph styles. This prevents the need for section breaks altogether. For example, if you want to double space in Word for just one section, apply a custom style rather than creating a new section.
4. Avoid Copying and Pasting from Formatted Documents
When you copy content from a heavily formatted document (especially PDFs or web pages), Word sometimes brings along hidden section breaks. Use Paste Special (Ctrl + Shift + V) and select “Unformatted Text” to paste clean content without hidden breaks.
5. Use Templates Carefully
If you’re using a Word template, it might have section breaks built in for headers, footers, and different page orientations. Before you start working, review the template structure and understand where the breaks are. This prevents accidental deletion later.
Related Formatting Issues and How They Connect
Section breaks don’t exist in a vacuum. They’re connected to other Word formatting features. Understanding these relationships helps you use section breaks effectively (and remove them when needed).
Section Breaks and Headers/Footers
Each section can have a different header and footer. If you remove a section break, the content below inherits the header/footer from the previous section. If you had a custom header in the section you’re deleting, it will disappear. Check headers before deleting section breaks.
Section Breaks and Page Numbering
You can restart page numbering at each section break. If you remove a section break that had custom page numbering, the numbering will reset to the previous section’s scheme. This is often unintentional and annoying. Plan ahead.
Section Breaks and Margins
Different sections can have different margins. Landscape tables often get their own section with wider margins. When you delete that section break, the table content goes back to the previous margins and might reflow unexpectedly. Test before committing.
Section Breaks and Columns
You can have multiple columns in one section and single columns in another. Section breaks make this possible. If you remove a section break that controls column layout, the text will reflow into the column scheme of the previous section.
The lesson: Section breaks are powerful because they control multiple formatting attributes at once. Before you remove one, understand what formatting it’s controlling. This prevents surprises.
For similar document management challenges in other Microsoft Office applications, you might find it helpful to understand how to remove empty rows in Excel or how to lock cells in Excel when you’re working with structured data.
Frequently Asked Questions
Why can’t I see the section break I’m trying to delete?
– You haven’t turned on formatting marks. Press Ctrl + Shift + 8 (Windows) or Cmd + Shift + 8 (Mac) to reveal hidden formatting. Section breaks only appear when formatting marks are visible. If you still don’t see it, it might be a page break instead (different symbol, same deletion method).
Will deleting a section break mess up my document’s formatting?
– Possibly, yes. When you delete a section break, the content below inherits the formatting of the section above. If the sections had different margins, headers, footers, page numbering, or orientation, the formatting will change. Check the formatting of both sections before deleting, and be ready to manually reformat if needed. Use Undo (Ctrl + Z) if things go sideways.
Can I delete multiple section breaks at once?
– Yes. Use Find & Replace (Ctrl + H on Windows, Cmd + H on Mac), click “More Options” or “Advanced,” click “Special,” select “Section Break,” leave the “Replace with” field empty, and click “Replace All.” This removes every section break in the document at once. Use with caution.
What’s the difference between a section break and a page break?
– A page break just moves content to the next page but doesn’t change formatting. A section break moves content to the next page (or same page, depending on type) and allows different formatting in that section. Section breaks are more powerful and more dangerous. Both are deleted the same way (click and delete), but they look different when formatting marks are on.
Why does the section break keep reappearing after I delete it?
– The document’s master formatting might be forcing it back, or the section break is tied to special formatting that Word is trying to protect. Try changing the formatting of both sections to match before deleting. If it still reappears, undo, and instead manually reformat the content to match the section you want to keep, then delete.
Can I delete a section break in a protected or shared document?
– Not if the document is locked or protected. You’ll need to unprotect it first. Go to “Review” tab → “Protect Document” (or “Unprotect Document” if it’s already protected) and remove the protection. Then you can delete section breaks. If it’s a shared document in OneDrive or SharePoint, make sure you have edit permissions.
What happens to headers and footers when I delete a section break?
– The content below the deleted section break inherits the header and footer from the previous section. If the deleted section had a custom header or footer, it’s gone. Before deleting, check if the section has a unique header/footer that you need to preserve. If so, copy it somewhere safe before deleting the section break.
Is there a way to undo a section break deletion if it breaks my formatting?
– Yes. Press Ctrl + Z (Windows) or Cmd + Z (Mac) immediately after deleting. Word’s undo history will restore the section break and all its formatting. You can undo multiple steps if needed. If you’ve already saved the document, you can’t undo, so always test on a copy first.
Can I convert a “Next Page” section break to a “Continuous” section break instead of deleting it?
– Yes. Click in the section with the break you want to change, go to “Layout” → “Breaks,” and select “Continuous.” This keeps the section but removes the page break. The section’s special formatting remains intact but now appears on the same page as the previous content. This is useful if you want to keep different margins or headers but don’t need a page break.
How do I know what formatting a section break is controlling?
– Click inside the section and check the Layout tab. Look at Margins, Orientation, and Page Setup. Compare these to the previous section. If they’re different, the section break is controlling those attributes. Check headers and footers by double-clicking in the header/footer area. Different headers/footers mean the section break is managing those too.


