
Nothing’s more frustrating than standing in your driveway with a new remote, jabbing buttons, and getting nothing but silence from your garage door. You’ve just installed a LiftMaster garage door opener—or maybe you inherited one from the previous homeowner—and now you need to actually make it work. The good news? Learning how to program LiftMaster garage door opener remotes is straightforward once you know the process. Most people can knock this out in under 10 minutes without any special tools.
The bad news: if you skip a step or misread the manual, you’ll be standing there wondering why your opener still won’t respond. That’s why we’re walking through this together.
What You’ll Need Before Starting
Here’s the thing about programming a LiftMaster garage door opener: you don’t need much. But what you do need, you actually need.
- The remote control (obviously) – Make sure it’s a LiftMaster-compatible remote or the original remote that came with your system
- Fresh batteries – This is non-negotiable. Dead or dying batteries are the #1 reason programming fails. Replace them before you start, even if the remote seems to work a little
- A ladder (optional but helpful) – The Learn button is usually on the back of the motor unit, which sits on your garage ceiling. You might need to reach it
- The owner’s manual – If you have it, keep it nearby. Different LiftMaster models have slight variations
- A clear line of sight – You’ll need to point the remote at the opener during programming, so make sure nothing’s blocking the signal
Before you touch anything, check whether your LiftMaster opener is a Security+ model or an older rolling-code system. This matters because the programming process differs slightly. Most modern LiftMasters (made after 2000) use Security+ technology, which is what we’re covering here. If your opener is older, the steps are similar but the Learn button might be in a different location or look different.
Pro Tip: Take a photo of the model number on your opener with your phone before you start. If you get stuck, you can quickly look up the exact manual online.
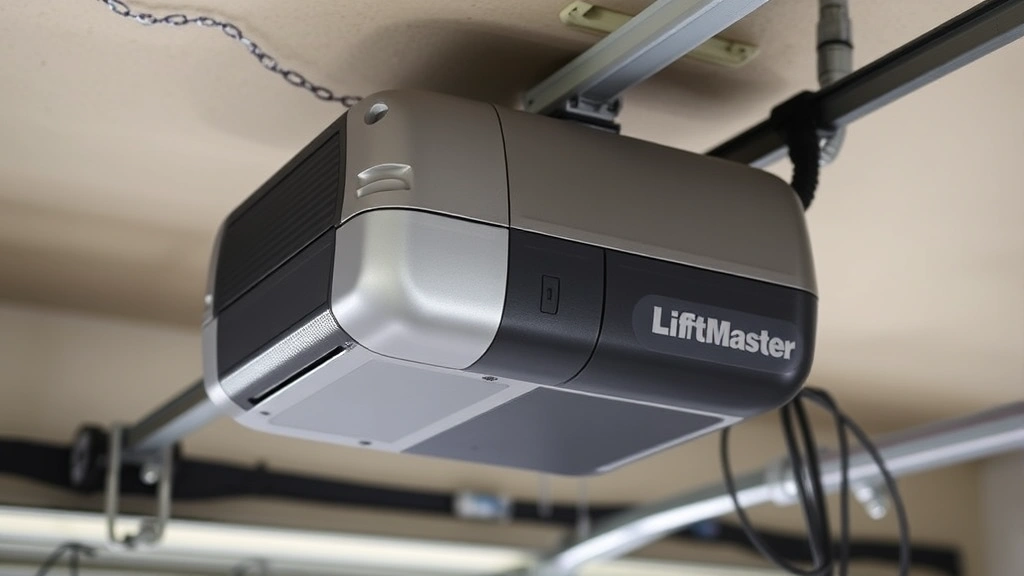
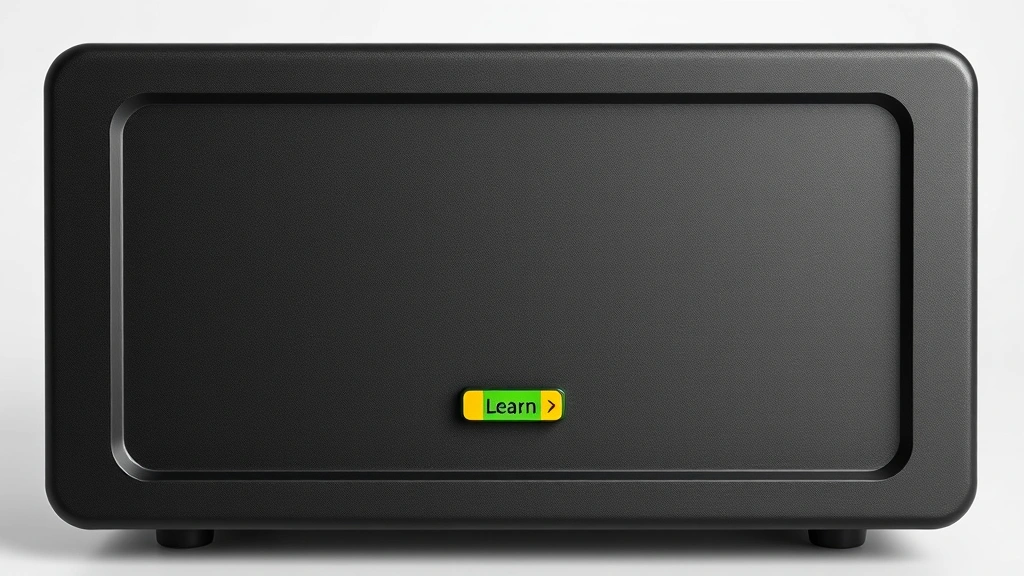
Finding the Learn Button on Your Opener
This is where a lot of people get stuck. The Learn button isn’t always obvious, and it’s not on the remote—it’s on the motor unit itself, usually mounted to your garage ceiling or wall.
Here’s where to look:
- On the back of the motor housing – This is the most common location. You might see a small purple, red, or yellow button
- On the side of the unit – Some models hide it here
- Behind a cover or panel – Occasionally you’ll need to pop off a plastic cover to access it
The Learn button is typically small—about the size of a doorbell button—and it’s usually labeled or color-coded. If you can’t find it, Family Handyman has a solid visual guide showing where different LiftMaster models hide this button.
Once you’ve located it, you’re ready to actually program. But don’t press it yet—timing is everything.
Programming a Single Remote Control
This is the basic process, and it’s the foundation for everything else you’ll do. Once you nail this, adding more remotes is just repetition.
Step 1: Clear the Existing Programming (Optional but Recommended)
If this is a used remote or you’re replacing an old one, it’s smart to clear any old programming first. This prevents conflicts. To do this:
- Locate the Learn button on your opener (the one we just found)
- Press and hold it for about 6 seconds until the light on the opener blinks or goes out
- Release the button. The opener has now forgotten all previously programmed remotes
This is optional if you’re programming a brand-new remote, but it’s good practice. Think of it like clearing your browser cache before installing new software.
Step 2: Put the Opener in Learning Mode
Now the real programming begins:
- Press the Learn button on the motor unit once. You’ll see a light blink or hear a click—this means the opener is now listening for a remote signal
- You have about 30 seconds to complete the next step, so don’t dawdle
Step 3: Press the Remote Button
- Point your remote at the opener (or at least in that general direction)
- Press and hold the button you want to use (usually the main button, but you can assign any button)
- Hold it for about 2-3 seconds, then release
- You should see the light on the opener blink again or hear a confirmation sound
Step 4: Test Your Remote
- Step back and press the button again
- Your garage door should open or close (depending on its current state)
- If nothing happens, go back to Step 2 and try again. Make sure you’re within 30 feet of the opener
That’s it. One remote, programmed. If it worked, congratulations—you just did the hardest part. If it didn’t, jump to the troubleshooting section.
Safety Warning: During testing, make sure the garage door path is clear. Garage doors are heavy and move fast. Never put your hands or head in the way, even during programming.
Adding Multiple Remotes to One Opener
Let’s say you’ve programmed one remote and it works great. Now you want to program a second one for your spouse, or a third for your teenager. Good news: it’s almost identical to what you just did, but with one key difference—you don’t clear the programming this time.
The Process for Remote #2, #3, and Beyond:
- Press the Learn button on the motor unit once (same as before)
- Within 30 seconds, point your new remote at the opener and press and hold the button for 2-3 seconds
- Release and test
That’s it. The opener adds each new remote to its memory instead of replacing the old one. You can typically program up to four remotes per opener, though some newer models support more.
Important: Each time you add a new remote, the opener’s memory gets a little more “crowded.” If you start having range issues or the door becomes less responsive, you might need to clear everything and start fresh. This is rare, but it happens with older units.
Programming a Wireless Keypad
Wireless keypads are a different beast from hand-held remotes, but the principle is the same. Instead of pressing a button on a remote, you’re entering a PIN code on a wall-mounted keypad.
Basic Wireless Keypad Programming:
- Locate the Learn button on your opener (same as before)
- Press it once to enter learning mode
- Go to your wireless keypad and enter your desired PIN code (usually 3-6 digits), then press the button to confirm
- You should hear a confirmation beep or see a light flash
- Test by entering the code again from outside or inside the garage
Some keypads have their own Learn button. If yours does, you might need to program both the opener and the keypad separately. Check your manual for this—it varies by model.
One advantage of keypads: you can change the PIN anytime without reprogramming the opener. One disadvantage: if you forget the PIN, you’re stuck. Write it down somewhere safe (not on the keypad itself, obviously).
Troubleshooting When Programming Fails
Programming didn’t work. Welcome to the club—this happens more often than you’d think. Here are the most common culprits and how to fix them:
Problem #1: The Remote Doesn’t Work After Programming
Check the batteries first. Seriously. Nine times out of ten, this is the problem. Replace them with fresh ones and try again. LiftMaster remotes are picky about battery voltage.
If the batteries are good, try reprogramming from scratch. Sometimes the signal doesn’t get through cleanly the first time. Clear the remote (press Learn for 6 seconds) and start over.
Problem #2: The Learn Button Won’t Light Up or Respond
Your opener might be in a lockout state. This happens if you’ve tried programming too many times in a row. The solution is simple: unplug the opener for 30 seconds, then plug it back in. This resets the system. Wait a minute and try again.
If the Learn button still doesn’t respond, check the power to your opener. Make sure it’s plugged in and the outlet has power. If you’re comfortable doing so, you can test the outlet with a multimeter, similar to how you’d check a car battery.
Problem #3: The Door Opens But the Remote Is Inconsistent
This usually means a range or signal issue. Move closer to the opener and try again. If it works from 5 feet away but not 30 feet away, the remote batteries might be low (replace them) or there’s interference from nearby electronics.
Metal structures, concrete walls, and certain electrical equipment can interfere with garage door signals. If your garage is surrounded by metal (like a metal shed or metal siding), you might have legitimate range limitations. This is frustrating but normal.
Problem #4: You Programmed Multiple Remotes But They Interfere With Each Other
This is rare with modern LiftMaster systems, but it happens. The fix is to clear all remotes and reprogram them one at a time, testing each before adding the next. Sometimes a remote will “stick” in the system and cause conflicts. Clearing everything and starting fresh usually solves it.
Pro Tip: If you’re having persistent issues, check This Old House’s garage door troubleshooting guide. They have excellent visual walkthroughs for different scenarios.
Security and Safety Considerations
Programming your garage door opener is mostly straightforward, but there are a few security and safety things you should know.
Security: Rolling Code Technology
Modern LiftMaster openers use something called rolling code (or Security+) technology. This means the code your remote sends changes every time you press the button. This prevents someone from recording your signal and replaying it to open your garage. It’s built-in and automatic—you don’t need to do anything special.
However, this also means that if your remote gets lost or stolen, you should reprogram your system. Clear all remotes and reprogram the ones you still have. This invalidates any codes the lost remote might have stored.
Safety: Garage Door Movement
During programming and testing, the garage door will move. Make sure:
- The path is completely clear of people, pets, and objects
- You’re not standing directly under the door
- You test from a safe distance (at least 6 feet away)
- Children and pets are supervised and understand not to play with the remote
Garage doors weigh 300-600 pounds. If something goes wrong, they can cause serious injury. This is rare, but it’s why you don’t mess around during testing.
Maintenance Tip:
Once your remotes are programmed, keep them in good condition. Replace batteries annually, even if they seem to work. Keep remotes away from extreme heat or moisture. If a remote stops working, try new batteries before assuming it’s broken—usually that’s all it needs.
For more on garage door safety, Bob Vila has a comprehensive safety guide worth reading if you have kids or pets.
Frequently Asked Questions
How long does it take to program a LiftMaster garage door opener?
– Most people can program a single remote in 5-10 minutes. If you’re adding multiple remotes, add another 2-3 minutes per remote. The actual programming process is quick; most of the time is spent locating the Learn button and testing.
Can I program a LiftMaster remote to work with a different brand of opener?
– Not typically. LiftMaster remotes are designed for LiftMaster openers. If you try to program a LiftMaster remote to a Chamberlain or Genie opener, it won’t work. However, LiftMaster is owned by the same parent company as Chamberlain, so some newer universal remotes might work with both—check the packaging.
What if I lose the remote and don’t have the manual?
– You can still reprogram. First, locate the Learn button on your opener (check the back and sides of the motor unit). Once you find it, the programming process is the same: press Learn, then press the button on your new remote within 30 seconds. If you absolutely can’t find the Learn button, the model number is usually on the motor housing—look it up online to find where the button is located.
Can I program a remote if the garage door opener is unplugged?
– No. The opener needs power to enter learning mode and accept the remote signal. Make sure it’s plugged in and powered on before you start programming.
Is it possible to program a remote too many times?
– Not really, but the opener has a learning lockout to prevent accidental programming. If you try to program too many times in quick succession, the opener will stop responding for a few minutes. Just unplug it for 30 seconds and try again.
Do I need to reprogram my remote after a power outage?
– No. The programming is stored in the opener’s memory, not in the remote. A power outage won’t erase it. However, if the power outage was severe or the opener was unplugged for an extended period, you might want to reprogram just to be safe.
Can I program a LiftMaster remote to multiple garage doors?
– Yes, but each garage door opener needs its own programming. You’d need to go to the first opener, program the remote, then go to the second opener and program the same remote button (or a different button on the same remote) to that opener. Each opener stores its own code.

What’s the difference between a Security+ remote and an older rolling-code remote?
– Security+ is the newer technology (introduced around 2000). It’s more secure and has better range. Older rolling-code remotes still work fine, but they’re more vulnerable to signal cloning. If you have an older opener, the programming process is almost identical—just check your manual to confirm the exact steps.
Can I program a remote if the garage door is broken or stuck?
– Yes. Programming doesn’t require the door to move. You can program the remote even if the door is stuck or broken. However, you won’t be able to test whether it works until the door is repaired. If you need to test, you can often manually move the door slightly to see if the remote is sending a signal (though this is tricky and not recommended if you’re not comfortable with it).


