
Swordfish intimidates a lot of home cooks. It’s expensive, it’s meaty, and if you mess it up, you’ve basically torched money. But here’s the real talk: how to cook swordfish is actually straightforward once you understand what makes it different from other fish. Swordfish isn’t delicate like sole or flaky like cod. It’s dense, substantial, and honestly closer to cooking a steak than cooking tilapia. That density is your friend—it means the fish forgives minor timing mistakes better than most seafood.
The biggest mistake people make? Overcooking it into a dry, rubbery brick. The second mistake? Not seasoning it boldly enough. Swordfish has a mild, slightly sweet flavor that needs backbone—acid, salt, and heat to shine. In this guide, we’ll walk through every method that actually works: grilling, pan-searing, baking, and broiling. You’ll learn exactly how to tell when it’s done, how to prep it, and how to handle it from fishmonger to plate.
Choosing and Storing Fresh Swordfish
Before you even think about how to cook swordfish, you need to start with quality fish. This matters more than technique—garbage in, garbage out.
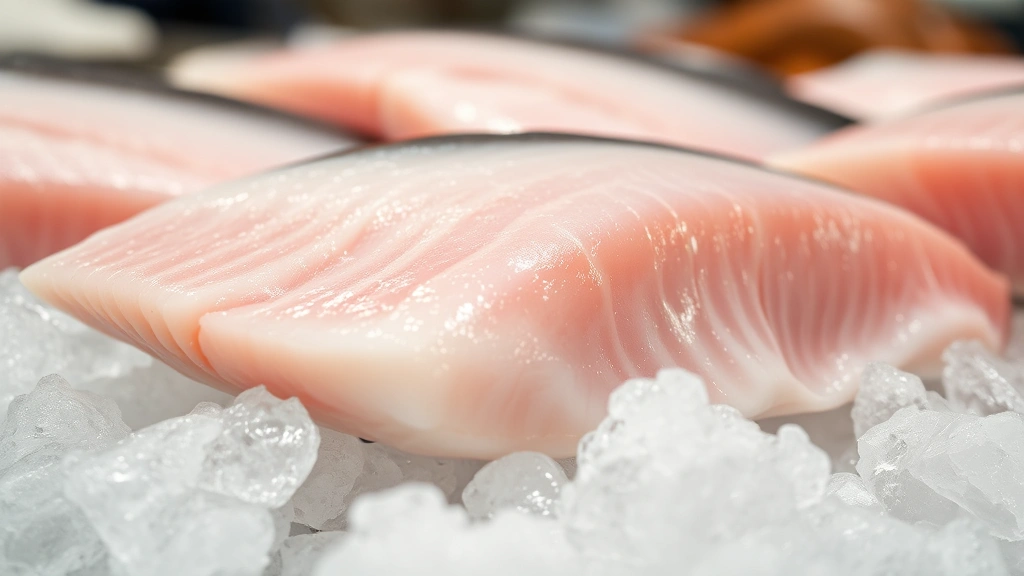
At the fishmonger: Look for steaks that are firm, not mushy. The flesh should be translucent and pale pink or off-white, with no brown or gray discoloration. If it smells fishy-fishy (like a dock, not like the ocean), walk away. Fresh swordfish should smell briny and clean, almost sweet. Ask the fishmonger when it came in. If it’s been sitting for more than two days, find another source. Don’t be shy—good fish shops expect these questions.
Swordfish is sold as steaks (cross-sections through the body, about 1 to 1.5 inches thick) rather than fillets. This is actually perfect for home cooking because the thickness and structure make it hard to accidentally shred during cooking.
Storage: Get it home and into the coldest part of your fridge immediately. Use it within 24 hours if possible, 48 hours maximum. If you can’t cook it that soon, freeze it. Wrap steaks tightly in plastic wrap, then aluminum foil, then into a freezer bag. Frozen swordfish holds for about three months. Thaw it in the fridge overnight, never on the counter.
Pro Tip: Ask your fishmonger to cut the steaks to 1.25 inches thick. Thinner steaks dry out faster; thicker ones are harder to cook through without overdoing the outside. This thickness is the sweet spot for home cooking.
Prep Techniques That Matter
Proper prep makes the difference between mediocre and restaurant-quality swordfish. Don’t skip this.
Pat it dry: Use paper towels to dry the surface completely. Moisture is the enemy of browning. Wet fish steams; dry fish sears. This is non-negotiable.
Season early: Salt the steaks 15-30 minutes before cooking. This seems counterintuitive (won’t salt dry it out?), but actually, salt draws moisture to the surface, then the surface evaporates, which concentrates flavor and helps browning. This is called osmosis, and it’s your friend. Season both sides and the thin edges.
Bring to room temperature: Take the steaks out 20-25 minutes before cooking. Cold fish cooks unevenly—the outside overdoes before the inside reaches temperature. Room temperature fish cooks through more predictably.
Consider brining (optional but excellent): For extra insurance against dryness, soak steaks in a simple brine (1/4 cup salt per quart of water, plus a squeeze of lemon) for 30-45 minutes. Rinse and pat dry before cooking. This is especially helpful if you’re nervous about timing.
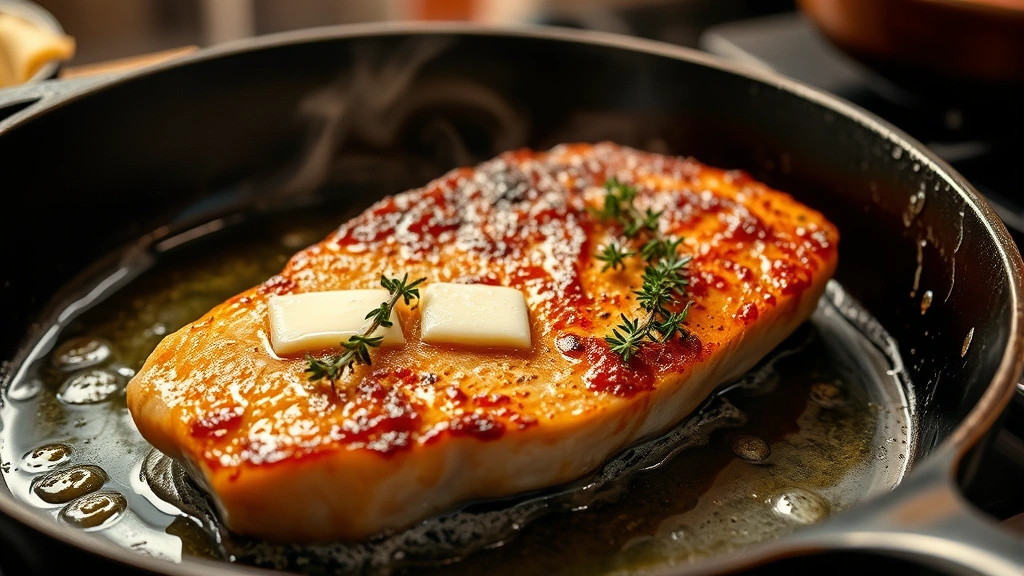
Pan-Searing: The Fastest Method
Pan-searing is the fastest, most foolproof way to cook swordfish at home. You get a golden crust and a moist interior in about 8-10 minutes total.
What you need:
- A heavy-bottomed skillet (cast iron or stainless steel, 10-12 inches)
- High-smoke-point oil (avocado, grapeseed, or refined vegetable oil—not olive oil for the initial sear)
- Butter (for finishing)
- Salt and pepper
The process:
- Heat the pan: Place your skillet over medium-high heat for 3-4 minutes. You want it hot enough that a drop of water sizzles and evaporates instantly, but not smoking. Too hot and the outside burns before the inside cooks; too cool and you get no crust.
- Oil the pan: Add about 2 tablespoons of oil and let it heat for 30 seconds. You should see it shimmer and move easily across the surface.
- Sear the steaks: Gently lay the swordfish away from you (to avoid splatters) and don’t touch it for 3-4 minutes. Seriously—don’t flip, don’t poke, don’t move it. You’re building a crust. You’ll know it’s ready to flip when it releases easily from the pan (try gently lifting an edge with a spatula).
- Second side: Flip and sear for another 3-4 minutes. The second side cooks faster because the pan is already hot and the fish is starting to cook through from the first side.
- Finish with butter: In the last 30 seconds, add a knob of butter, a crushed garlic clove, and fresh herbs (thyme or rosemary work great). Tilt the pan and baste the fish with the foaming butter. This adds flavor and ensures even cooking.
- Rest: Transfer to a plate and rest for 2-3 minutes. This lets the residual heat finish cooking the very center without drying the outside.
Timing by thickness: For 1.25-inch steaks, 3-4 minutes per side is standard. For thicker steaks (1.5 inches), go 4-5 minutes per side. Thinner steaks (1 inch) need only 2-3 minutes per side. Adjust based on your stove’s heat output—every kitchen is different.
The internal temperature should reach 145°F (63°C) at the thickest part, measured with an instant-read thermometer. At 145°F, the fish is opaque throughout but still moist. Any higher and you’re pushing into dry territory.
Grilling Swordfish Steaks
Grilling is where swordfish really shines. The high, direct heat creates a beautiful char and smoky flavor that complements the fish’s meatiness.
Setup: Use a gas or charcoal grill. For charcoal, you want hot coals pushed to one side, creating a two-zone fire (hot zone and cooler zone for insurance). For gas, heat all burners to high for 10 minutes, then you can dial back one side if needed.
Grill grates matter: Clean them thoroughly with a grill brush. Swordfish will stick to dirty grates. After cleaning, oil the grates lightly with a high-smoke-point oil on a paper towel. This is your insurance policy against sticking.
The cook:
- Place steaks directly over the hottest part of the grill.
- Sear for 3-4 minutes without moving them. You want those crosshatch marks.
- Flip once and sear the other side for 3-4 minutes.
- If the steaks are thick (over 1.5 inches), move them to the cooler zone for 2-3 minutes to finish cooking through without charring the outside.
- Target internal temperature: 145°F.
The grill imparts a smokiness that pan-searing can’t match. If you have access to a grill and time to use it, this is the method to choose. Pair grilled swordfish with bright, acidic sides—lemon, lime, or a fresh salsa cuts through the richness beautifully.
Safety Warning: Don’t grill swordfish directly on aluminum foil unless you want the foil to stick to the fish. If you’re nervous about sticking, use a grill basket or a piece of parchment paper (yes, parchment works on grills for short cooking times). Better yet, just oil the grates well and trust the process.
Baking and Broiling
Baking (the gentle method): Baking is forgiving and hands-off, perfect if you’re feeding a crowd or cooking multiple steaks.
- Preheat your oven to 400°F (200°C).
- Place steaks on a parchment-lined baking sheet.
- Drizzle with olive oil, season with salt and pepper.
- Bake for 12-15 minutes (depending on thickness) until the internal temperature reaches 145°F.
- Optional: Finish under the broiler for 1-2 minutes to add a light crust if you want.
Baking won’t give you the crust you get from pan-searing or grilling, but it’s reliable and keeps the fish moist. It’s also the best method if you’re adding a topping (breadcrumbs, herbs, cheese) because the oven’s even heat won’t scorch the topping.
Broiling (the fast method): Broiling uses intense, direct heat from above—think of it as an upside-down grill.
- Preheat your broiler for 5 minutes.
- Place steaks on a broiler pan (the slotted kind that lets heat circulate).
- Position the rack 4-6 inches from the heating element.
- Broil for 6-8 minutes, checking at 5 minutes. The fish should be opaque and flaking slightly at the edges.
- No need to flip—the top heat is intense enough to cook through.
Broiling is fast and creates a nice crust, but it’s easy to overcook because the heat is so direct. Watch it like a hawk. Set a timer and don’t wander off.
How to Tell When Swordfish is Done
This is the critical skill that separates dry, rubbery swordfish from moist, perfect swordfish.
The thermometer method (most reliable): Insert an instant-read thermometer into the thickest part of the steak, perpendicular to the surface. Target 145°F (63°C). This is the FDA’s recommended safe internal temperature for fish. At this temperature, the flesh is opaque and just barely moist in the center. It’s the Goldilocks zone.
The visual method (if you don’t have a thermometer): Look at the flesh. Raw swordfish is translucent and shiny. As it cooks, it becomes opaque and loses shine. When the entire steak is opaque from edge to edge, it’s done. The very center might still look slightly translucent, and that’s fine—carryover cooking will finish it. If you wait until the center is completely opaque, you’ve overcooked it.
The touch method (least reliable but useful): Press the thickest part of the steak with your finger. Raw fish feels squishy and gives easily. Medium-rare fish feels slightly firm but still has a tiny bit of give. Well-done fish feels firm and springy. For swordfish, aim for that slightly-firm-with-a-hint-of-give feeling.
Carryover cooking: Remember that the fish keeps cooking for 2-3 minutes after you pull it off heat. If your thermometer reads 140°F, pull it off the heat—it’ll climb to 145°F by the time you plate it. This is why resting matters.
Overcooking swordfish is the most common mistake. It’s a lean fish (unlike salmon or mackerel), so it has little fat to protect it from drying out. Respect the 145°F target and you’ll be fine.
Seasoning and Sauce Pairings
Swordfish’s mild, slightly sweet flavor needs bold seasoning. Don’t be timid.
Simple seasoning approach: Salt, pepper, and a squeeze of fresh lemon juice. That’s it. This lets the quality of the fish shine. If you’ve bought good fish, this is all you need.
Herb crusts: Mix panko breadcrumbs with chopped fresh herbs (parsley, dill, or basil), grated Parmesan, salt, and pepper. Press this onto the steaks before cooking. Works beautifully when baking or broiling.
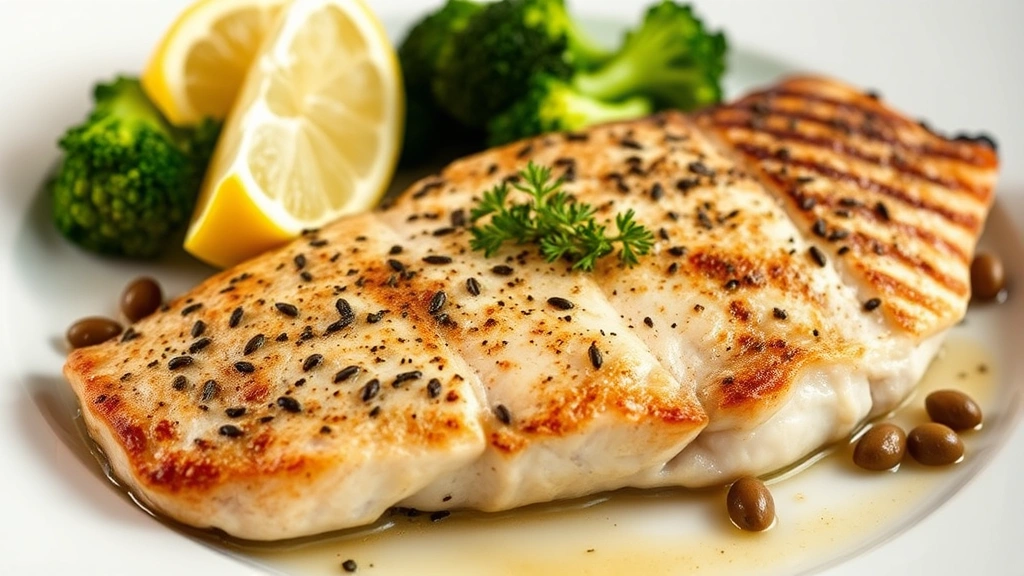
Mediterranean flavors: Pair swordfish with steamed broccoli, capers, olives, and a lemon-garlic sauce. The acidity cuts through the fish’s richness.
Tropical twist: Serve with a fresh pineapple salsa (diced pineapple, red onion, cilantro, lime juice, jalapeño). The sweetness and acidity complement swordfish’s meatiness.
Compound butter: Mix softened butter with minced garlic, fresh herbs, lemon zest, and a pinch of red pepper flakes. Top the hot fish with a pat of this butter and watch it melt into a sauce. Restaurant-quality with zero effort.
Sauce recommendations:
- Chimichurri: Parsley, garlic, red pepper flakes, vinegar, and olive oil. Bright, herbaceous, and perfect for grilled fish.
- Beurre blanc: A classic French butter sauce with white wine and shallots. Fancy but not difficult.
- Miso glaze: White miso, soy sauce, honey, and ginger. Brush it on during the last minute of cooking for a glossy, umami-rich finish.
- Salsa verde: Tomatillos, cilantro, onion, and jalapeño. Fresh and zesty.
The key is acid and salt. Swordfish is rich enough that it needs brightness. Lemon, lime, vinegar, or tomato all work beautifully. Avoid heavy cream sauces—they drown the fish’s subtle flavor.
For side dishes, think light. Fresh vegetables, grains like quinoa or couscous, or a simple green salad all complement swordfish without competing for attention.
Frequently Asked Questions
Can I cook frozen swordfish without thawing?
– You can, but it’s not ideal. Frozen swordfish takes about 50% longer to cook and tends to dry out more because the thawing process inside the fish is uneven. If you’re in a bind, thaw it in cold water (sealed in a bag) for 30-45 minutes, then cook as normal. Proper thawing in the fridge overnight is always better.
Why is my swordfish always dry?
– You’re overcooking it. Swordfish is lean and forgiving only if you hit the 145°F target. Any higher and it dries out fast. Use a thermometer, not guesswork. Also, make sure you’re buying fresh fish from a reputable source—old fish loses moisture faster than fresh fish, no matter how perfectly you cook it.
What’s the difference between swordfish steaks and fillets?
– Swordfish is almost always sold as steaks (cross-sections through the body with bone in the center). Fillets are rare and expensive. Steaks are actually easier to cook because they hold together better and are less likely to overcook on the outside before the inside is done. Embrace the steak cut—it’s your friend.
Can I marinate swordfish?
– Yes, but keep it short—15-30 minutes maximum. Longer than that and the acid in the marinade will start to “cook” the fish (like ceviche), which changes the texture. A simple marinade of olive oil, lemon juice, garlic, and herbs is perfect. Pat the fish dry before cooking to ensure good browning.
Is swordfish safe to eat? (Mercury concerns)
– Swordfish is a larger fish and does accumulate more mercury than smaller fish. The FDA recommends that pregnant women, nursing mothers, and young children limit swordfish to once per week or less. Adults can eat swordfish 2-3 times per week without concern. If you’re worried, alternate swordfish with lower-mercury fish like cod or tilapia.
How much swordfish should I cook per person?
– Plan for 6-8 ounces (170-225 grams) of swordfish per person as a main course. Swordfish is dense and filling, so this amount is more satisfying than the same weight of lighter fish like flounder. A 1.25-inch-thick steak usually weighs 8-10 ounces, so one steak per person is typical.
Can I cook swordfish in a slow cooker or instant pot?
– No. Moist-heat cooking methods (steaming, poaching, slow cooking) are not ideal for swordfish because they don’t create any crust and can make the texture mushy. Stick to dry-heat methods: searing, grilling, baking, or broiling. These methods respect the fish’s meaty texture.
What if I accidentally overcooked my swordfish?
– It happens. Don’t throw it away. Flake the overcooked swordfish and use it in a fish salad, toss it with pasta and a light sauce, or crumble it into a fish cake. The moisture loss is already done, so your best bet is to add moisture back through a sauce or preparation method.
Is wild-caught or farm-raised swordfish better?
– Swordfish is almost always wild-caught because commercial farming of swordfish isn’t common. Wild swordfish has a slightly more robust flavor than farmed fish (which is rare to find). Look for swordfish caught using pole-and-line methods or harpoon, which are sustainable. Avoid bottom-trawled swordfish if you can. Ask your fishmonger about the source—good shops know and care about this.
Why does my swordfish have a strong, unpleasant smell?
– That’s a sign the fish is old or has been stored improperly. Fresh swordfish smells briny and clean, like the ocean. A strong, ammonia-like, or sulfurous smell means bacteria have begun breaking down the fish. Don’t cook it. Return it to the fishmonger or the store. Food safety isn’t worth saving a few dollars.
Learning how to cook swordfish is genuinely one of the easier fish skills to master. The fish’s density and meaty texture forgive minor mistakes that would ruin delicate fish like sole. Start with pan-searing if you’re nervous—it’s fast, you can watch the fish the whole time, and you’ll get a beautiful crust. Once you’ve nailed the basics, experiment with grilling and different seasonings. Quality fish plus proper temperature control equals restaurant-quality results at home. You’ve got this.
For additional cooking techniques and fish preparation tips, check out resources like Family Handyman’s kitchen section, which covers meal prep fundamentals, and This Old House’s food and kitchen guides for broader cooking skills. You can also reference the FDA’s food safety guidelines for proper internal temperatures and storage practices across all proteins.


