

Look, if you’re staring at a 50-page document and thinking “I need a table of contents but have no idea where to start,” you’re not alone. Most people assume it’s some complicated Word wizard nonsense. Spoiler alert: it’s not. Learning how to insert table of contents in word takes about 5 minutes, and once you nail it, you’ll wonder why you ever manually typed one out. This guide walks you through every method—from the dead-simple automatic route to the custom tweaks that make your document look polished.
The Automatic Method (Easiest)
Here’s the thing: Word can generate a table of contents automatically if your document is set up right. This is the path of least resistance, and honestly, it’s the best way to do it.
- Place your cursor where you want the table of contents to appear (usually the beginning, after your title page).
- Go to the “References” tab at the top of Word.
- Click “Table of Contents” in the left section.
- Choose a style from the dropdown menu. Word offers automatic options like “Automatic Table 1” or “Automatic Table 2.”
- Done. Word scans your document for heading styles and builds the TOC in seconds.
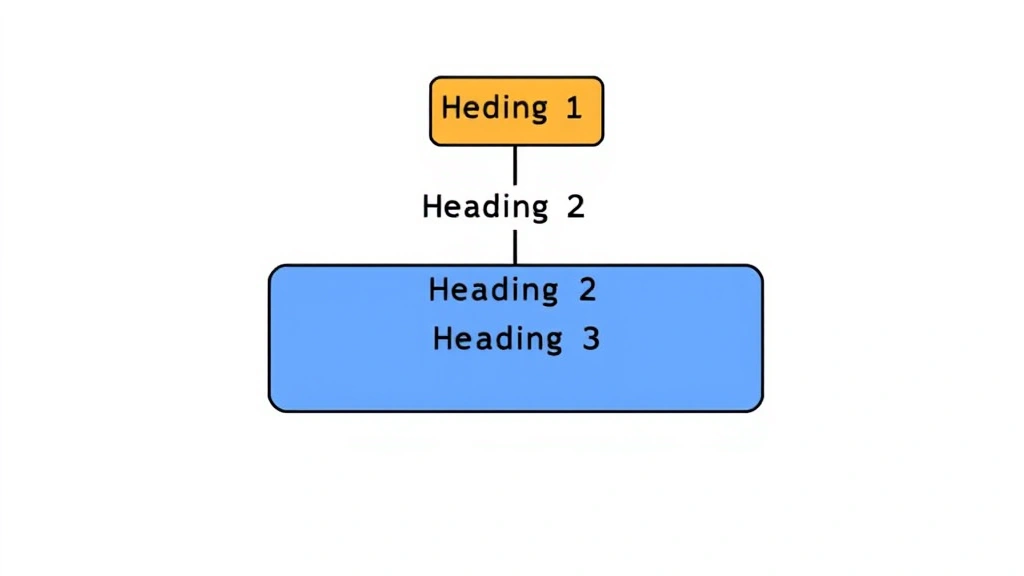
That’s it. The automatic method works because Word looks for specific heading styles (Heading 1, Heading 2, etc.) throughout your document. If you’ve formatted your section titles properly, Word pulls them in automatically. Think of it like tagging—you tag your headings, Word finds the tags, and boom, instant table of contents.
Pro Tip: If you want a custom look, don’t panic. You can always modify the style later. The automatic method is just the foundation.
Why Heading Styles Matter
This is where most people mess up. They’ll highlight a title, make it bold, increase the font size to 16pt, and think “that’s a heading.” Nope. Word doesn’t recognize that as a heading for TOC purposes. You need to use Word’s built-in heading styles.
Here’s how to apply proper heading styles:
- Select the text you want to be a heading (like “Chapter 1: Introduction”).
- Go to the “Home” tab.
- In the “Styles” section, click “Heading 1” (or Heading 2 for subheadings).
- Watch Word automatically format it with the correct font, size, and spacing.
The hierarchy matters. Use Heading 1 for your main sections, Heading 2 for subsections, and Heading 3 for sub-subsections. Word builds the TOC based on this structure. If everything is Heading 1, your table of contents looks flat and useless. If you mix them properly, it looks professional and actually helps readers navigate.
According to Family Handyman’s documentation standards, proper document hierarchy isn’t just about looks—it’s about usability. The same principle applies to Word documents: structure first, formatting second.
Custom Table of Contents Options
Once you understand the basics, you can customize your table of contents to fit your needs. Word isn’t one-size-fits-all, and that’s actually great.
Option 1: Manual Table of Contents
If you want total control (and don’t mind updating it by hand), use the manual option:
- Go to References > Table of Contents
- Click “Manual Table” at the bottom
- Word inserts a placeholder you can edit directly
This is useful if your document structure is unusual or if you want entries that don’t match your actual headings. The downside? You update it yourself. No automation. Real talk: this gets annoying fast.
Option 2: Custom Styles
Maybe you don’t want your TOC to include every single heading. Perhaps Heading 3 entries are too granular. Here’s how to customize which styles appear:
- Go to References > Table of Contents
- Click “Custom Table of Contents” (sometimes labeled as “More Tables”)
- A dialog box opens with options
- Under “General,” you can choose which heading levels to include (1-3, 1-2, etc.)
- Click OK
This is where how to insert table of contents in word gets flexible. You control the depth and appearance without breaking anything.
How to Update Your Table of Contents
Here’s a scenario: you finish your document, insert the TOC, then realize you need to add a new section. Or you change a heading. Now your table of contents is outdated. Don’t panic—updating is one click.
- Right-click anywhere in your table of contents
- Click “Update Field”
- Choose “Update entire table” if you changed headings or page numbers
- Click OK
Word rescans the document and updates everything. Page numbers, heading text, all of it. This is why the automatic method is so powerful—you’re not glued to manual updates.
Safety Warning: If you manually edit the table of contents and then update it, Word overwrites your changes. Always regenerate from the automatic method, or stick with the manual option if you’re customizing entries.
Formatting Your Table of Contents
The default table of contents works, but it might not match your document’s style. Here’s how to make it look intentional.
Changing TOC Styles
When you insert a table of contents, Word applies a “TOC” style to it. You can modify this:
- Right-click in the table of contents
- Select “Styles > Modify Style” (or go to Home > Styles and right-click “TOC 1”)
- Adjust font, size, spacing, color, etc.
- Click OK
This updates the appearance across the entire TOC without breaking the automatic functionality.
Adjusting Tab Leaders and Spacing
Tab leaders (those dots between the heading and page number) are optional but professional-looking. To modify them:
- Right-click your table of contents
- Click “Edit Field”
- In the dialog, look for options related to formatting
- You can also manually adjust by selecting the TOC and using Format > Tabs
Honestly, the default settings usually look good. Don’t overthink it. The goal is readability, not decoration.
Troubleshooting Common Problems
Problem 1: “Table of Contents shows only heading text, no page numbers”
This usually means your document isn’t paginated properly or Word can’t detect page breaks. Solution:
- Make sure you’re not in “Draft” view. Switch to “Print Layout” view (View tab)
- Check that your headings actually use heading styles (not just bold text)
- Update the field (right-click > Update Field)
Problem 2: “Some headings aren’t showing up in the TOC”
Possible causes:
- You formatted the heading manually instead of using a style
- The heading uses a custom style that isn’t linked to TOC levels
- The heading is inside a text box or table (Word sometimes misses these)
Fix: Reapply the proper heading style to the missing entries and update the field.
Problem 3: “Page numbers are wrong or don’t update”
This happens when you’ve moved content around. The TOC cached old page numbers.
- Right-click the TOC
- Click “Update Field”
- Select “Update entire table”
- Click OK
If it still doesn’t work, delete the TOC and regenerate it. Sounds drastic, but it’s faster than debugging.
Problem 4: “My TOC has weird formatting or extra blank lines”
Word sometimes adds formatting quirks. To clean it up:
- Select the entire TOC
- Go to Home > Clear Formatting
- Delete and regenerate the TOC
This resets it to default and usually solves the issue.
Advanced Tricks for Power Users
Using Outline View to Check Your Structure
Before you generate a TOC, use Outline view to verify your document structure:
- Go to View > Outline
- You’ll see your entire document as a hierarchy of headings
- This shows you exactly what will appear in the TOC
- It’s also useful for reorganizing sections quickly
Think of Outline view like an X-ray. You see the skeleton of your document without the flesh. It’s invaluable for long papers or books.
Creating a TOC with Custom Levels
If you want entries that don’t use standard heading styles, you can mark them manually:
- Select the text you want in the TOC
- Go to References > Mark Entry
- Choose the level (1, 2, 3, etc.)
- Click Mark All to mark all instances
- Generate your TOC normally
This lets you include non-heading content (like sidebar titles or special sections) in your table of contents. It’s overkill for most documents, but it exists if you need it.
Linking TOC Entries to Bookmarks
For interactive PDFs or digital documents, you can link TOC entries to bookmarks:
- Create bookmarks for sections you want to link to (Insert > Bookmark)
- In the TOC, right-click an entry
- Select “Edit Link” and point it to the bookmark
- In a PDF, clicking the TOC entry jumps to that section
This is particularly useful if you’re sharing documents digitally. It’s also mentioned in This Old House’s digital documentation practices—the principle of linking and navigation applies across all media.
Excluding Specific Headings from the TOC
Sometimes you have a heading you don’t want in the table of contents (like “Appendix” or “References”). Here’s how to exclude it:
- Select the heading
- Go to Home > Styles
- Right-click the heading style being used
- Click “Modify”
- In the dialog, click “Format > Paragraph”
- Look for an option like “Don’t include in table of contents” (varies by Word version)
Alternatively, some users manually edit the TOC after generation and delete unwanted entries, then protect the TOC from updates. It’s less elegant but works in a pinch.
For best practices on document organization, check Bob Vila’s guide to clear documentation—the principles of logical structure and user guidance apply whether you’re writing instructions or academic papers.
Frequently Asked Questions
Can I insert a table of contents in the middle of my document?
– Yes. Place your cursor where you want it (after your introduction, for example) and insert it normally. Word will still reference all headings in the entire document, regardless of where the TOC appears.
What’s the difference between “Automatic Table” and “Manual Table”?
– Automatic Table scans your document for heading styles and updates when you refresh it. Manual Table is a static placeholder you edit yourself. Use Automatic unless you have a specific reason not to.
Why doesn’t my table of contents include all my headings?
– Most likely, those headings aren’t formatted with Word’s heading styles. They might be bold or larger text, but not actual Heading 1/2/3 styles. Apply the correct style and update the TOC.
Can I customize the colors and fonts of my table of contents?
– Absolutely. Right-click the TOC, select “Styles,” then modify the TOC style to your liking. You can change fonts, sizes, colors, spacing—whatever matches your document’s design.
How do I make sure page numbers are correct in my table of contents?
– Use Print Layout view (not Draft view), make sure your document has proper page breaks, and always update the field before finalizing. If you move content around, update the TOC again.
What happens if I delete my table of contents and need to recreate it?
– No problem. Just insert a new one the same way. As long as your heading styles are intact, Word will rebuild it identically. You can do this as many times as you want.
Can I have multiple tables of contents in one document?
– Yes, but it’s unusual. You’d typically have one main TOC at the beginning. Some long documents (like dissertations) have a TOC, then a separate “List of Figures” or “List of Tables,” which uses similar logic but different styles.
Is there a keyboard shortcut to update the table of contents?
– Not a direct one, but you can right-click and select “Update Field” quickly. In some Word versions, Ctrl+A (select all) followed by F9 updates all fields, including the TOC.
How do I insert a table of contents in Word for Mac?
– The process is nearly identical. Go to the “References” tab (or “Insert” in older versions), click “Table of Contents,” and choose your style. The steps and options are the same.
What if I want page numbers on the right side with dots leading to them?
– That’s the default style for most TOC templates. If yours doesn’t have it, right-click the TOC and edit the field to adjust the formatting options. You can also modify the TOC style to include tab leaders.


