How to Add Checkbox in Word: Simple & Essential Guide
Need to create interactive forms or checklist documents? Learning how to add checkbox in Word is easier than you think and takes just minutes to master. Whether you’re building a survey, task list, or official form, checkboxes make your documents more functional and professional. This guide walks you through every method available in Microsoft Word, from the Developer Tab approach to content controls, ensuring you can choose the technique that best fits your needs.
Quick Answer: To add a checkbox in Word, enable the Developer Tab (File → Options → Customize Ribbon), then click Developer → Checkbox Content Control. You can also insert checkboxes using the Insert menu or by typing special characters. For interactive forms, content controls provide the most reliable solution that works across different Word versions and platforms.
Tools & Materials You’ll Need
- Microsoft Word (2016 or later recommended)
- A document file ready for editing
- Administrator access to enable Developer Tab
- Optional: A template for forms or checklists
- Optional: Knowledge of how to make a copy of a Word document for backup purposes
Enable the Developer Tab in Word
The Developer Tab is your gateway to advanced Word features, including checkboxes and form controls. By default, Microsoft Word hides this tab, but enabling it takes just a few clicks. This is the essential first step for anyone wanting to add checkbox in Word using the most reliable method available.
Open Microsoft Word and click on File in the top-left corner. Navigate to Options at the bottom of the menu. In the Word Options dialog, select Customize Ribbon from the left sidebar. You’ll see two columns: one showing available tabs and another showing main tabs. In the right column, locate and check the box next to Developer. Click OK to apply the changes.
After completing these steps, you’ll notice a new Developer tab appears in your ribbon menu between the View and Design tabs. This tab contains all the tools you need for creating interactive forms and adding checkboxes. If you don’t see it immediately, try closing and reopening Word to refresh the interface.
Pro Tip: Keep the Developer Tab enabled even after completing your checkbox task. You’ll likely need it for future Word documents involving forms or advanced formatting.
Insert Checkbox Using Content Control
Content controls represent the most modern and reliable way to add checkbox in Word for interactive documents. These controls work seamlessly across different Word versions and maintain functionality when documents are shared or converted. Content control checkboxes are clickable, allowing users to toggle them on and off with a single click.
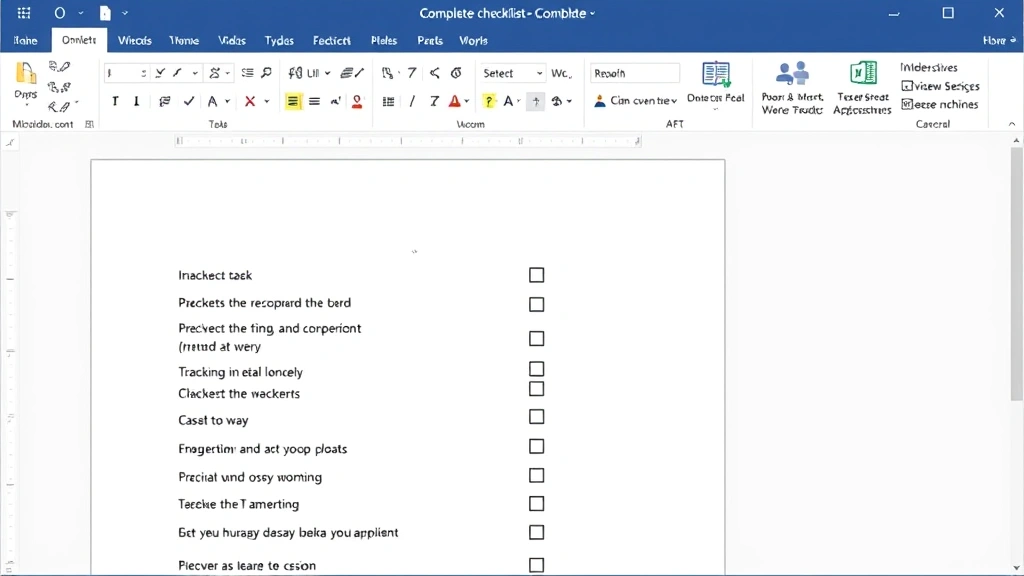
With the Developer Tab now visible, click on the Developer tab in your ribbon. Position your cursor exactly where you want the checkbox to appear in your document. In the Controls group, locate the Checkbox Content Control button (it typically shows a checkbox icon). Click this button to insert a checkbox at your cursor position.
The checkbox will appear as a small square box in your document. Users can click directly on it to toggle between checked and unchecked states. You can insert multiple checkboxes by repeating this process for each item in your list. This method is particularly useful when creating surveys, task lists, or official forms that need to be filled out digitally.
According to WikiHow, content controls are the preferred method for creating professional forms in Word because they provide consistent behavior across different devices and operating systems. This reliability makes them ideal for documents that will be distributed to multiple users.

Add Checkboxes Using Special Characters
If you need a simpler approach that doesn’t require the Developer Tab, you can insert checkbox symbols using Word’s Special Characters feature. This method works well for static checkboxes in checklists or documents where users won’t need to interact with the checkboxes digitally.
Click on the Insert tab in your ribbon menu. Select Symbol from the right side of the toolbar. A dropdown menu appears; click on More Symbols to open the Symbol dialog box. In the dialog, change the Font dropdown to Wingdings or Wingdings 2, which contain checkbox characters.
Search for checkbox symbols by scrolling through the character grid. You’ll find several checkbox variations: empty boxes (☐), checked boxes (☑), and crossed boxes (☒). Select the checkbox style you prefer and click Insert. Close the dialog when finished. You now have a checkbox symbol in your document that you can copy and paste to create multiple checkboxes throughout your document.
This method is faster for simple documents but doesn’t provide interactivity. Users viewing your document will see static checkbox symbols rather than clickable elements. For printed documents or PDFs where interactivity isn’t needed, this approach is perfectly adequate and requires no special setup.
Create Interactive Form Checkboxes
Interactive form checkboxes elevate your document from a static text file to a functional tool that users can actually complete. When you create interactive checkboxes, recipients can open your document, check the boxes by clicking, and save their responses without printing or manually marking the form.
Start by enabling the Developer Tab if you haven’t already. Create your form structure by typing the text labels for each checkbox item. Position your cursor next to the first label where you want the checkbox to appear. Click Developer → Checkbox Content Control. Repeat this process for each item requiring a checkbox.
To make your form more user-friendly, add instructions at the top explaining that users should click checkboxes to select options. You can also customize the appearance of each checkbox by right-clicking on it and selecting Properties. In the Content Control Properties dialog, you can change the checkbox style, assign a title, and set other display options.
As reviewed by Instructables, interactive forms with checkboxes are particularly valuable for businesses collecting feedback, surveys, or applications. They reduce confusion about how to complete the form and make data collection more efficient.
Format and Customize Your Checkboxes
Customizing your checkboxes ensures they match your document’s style and clearly communicate their purpose to users. Word offers multiple formatting options that allow you to create a professional, cohesive appearance throughout your form or checklist.
Right-click on any checkbox you’ve inserted and select Properties to access customization options. In the Content Control Properties window, you can change the Title (what appears when you hover over the checkbox) and Tag (useful for organizing multiple checkboxes). You can also change the checkbox style from the dropdown menu, selecting different symbols or appearance options.
To adjust the size of your checkboxes, select the checkbox and use the font size controls in your toolbar. Increasing the font size makes checkboxes more visible and easier to click, which is especially important for documents that will be viewed on tablets or mobile devices. You can also change the color of checkboxes by selecting them and using the font color option.
For a professional appearance, maintain consistent checkbox formatting throughout your document. Use the same size, color, and style for all checkboxes in a single form. You can quickly apply formatting to multiple checkboxes by selecting them all at once (hold Ctrl and click each checkbox) and then applying your chosen formatting.
Protect Your Form Document
After creating your checkboxes and form structure, protecting your document prevents users from accidentally deleting or modifying the form layout while still allowing them to interact with the checkboxes. This step is crucial for maintaining form integrity when sharing documents with others.
Click on the Developer tab and locate the Protect Document button in the Protect group. Select Restrict Editing to open the Restrict Editing pane on the right side of your screen. Check the box next to Editing restrictions and select Filling in forms from the dropdown menu.
Click Yes, Start Enforcing Protection. You’ll be prompted to create a password (optional but recommended). Enter a password if you want to prevent others from unprotecting the document, then click OK. Your form is now protected, meaning users can only click checkboxes and fill in designated form fields while being unable to modify the form structure itself.
When users open your protected form, they’ll see a notification that the document is restricted to form filling. They can complete the form by clicking checkboxes and typing in text fields, but they cannot delete content or change the layout. This protection ensures your carefully designed form remains intact across multiple uses and users.
Troubleshooting Common Issues
Even experienced Word users encounter occasional issues when working with checkboxes. Understanding common problems and their solutions helps you quickly resolve issues and maintain productivity.
Checkboxes Not Appearing: If checkboxes don’t show up after clicking the Content Control button, ensure you’re in the correct position in your document and that the Developer Tab is properly enabled. Try closing and reopening Word to refresh the interface. If problems persist, update Microsoft Word to the latest version.
Checkboxes Not Clickable: If your checkboxes aren’t responding to clicks, your document may have protection enabled. Check if the document is in a protected or read-only mode. You can also try disabling form protection temporarily to verify the checkboxes work, then re-enable protection afterward.
Formatting Issues: If checkboxes appear misaligned or improperly sized, select them and adjust the font size using your toolbar. Ensure you’re not using conflicting formatting options that might affect checkbox appearance. For consistent results, use the same font throughout your form.
Compatibility Issues: If recipients report that checkboxes don’t work when they open your document, they may be using an older version of Word or a different application like Google Docs. Save your document in a compatible format (.docx rather than .doc) and test it with the applications your recipients will use.
For additional guidance on protecting sensitive documents, you might find our article on how to password protect files helpful for understanding document security principles that apply across Office applications.
FAQ
Q: Can I use checkboxes in Google Docs?
A: Google Docs has limited checkbox functionality compared to Microsoft Word. You can insert checkbox symbols, but they won’t be interactive like Word’s content control checkboxes. For interactive forms, Word remains the better choice, though you can export Word documents to Google Docs with some formatting limitations.
Q: Will checkboxes work if I save my document as a PDF?
A: Interactive checkboxes created in Word will become static symbols when converted to PDF unless you use specific PDF form creation tools. If you need interactive forms in PDF format, consider using Adobe Acrobat or specialized form software. For Word documents shared among users, maintain the .docx format for full interactivity.
Q: How many checkboxes can I add to a single document?
A: Word has no practical limit on the number of checkboxes you can add. However, very large documents with hundreds of checkboxes may experience slower performance. For optimal performance, keep documents under 50 pages with reasonable checkbox density.
Q: Can I make checkboxes required fields in my form?
A: Content control checkboxes don’t have built-in requirement settings like some form software. However, you can add instructions directing users to check specific boxes and manually verify completion. For advanced form validation, consider using Microsoft Forms or specialized form software.
Q: What’s the difference between checkboxes and radio buttons in Word?
A: Checkboxes allow multiple selections from a list, while radio buttons (also available in the Developer Tab) allow only one selection. Use checkboxes for “select all that apply” scenarios and radio buttons for “choose one option” situations.
Q: How do I copy checkbox formatting to other checkboxes?
A: Select a formatted checkbox, then use Format Painter (double-click the paintbrush icon in your toolbar) and click on other checkboxes to apply the same formatting. This ensures consistency across your entire form.
When distributing your form to others, you might want to reference our guide on making content shareable for tips on distributing documents effectively across different platforms and channels.
Q: Can I track which checkboxes users have selected?
A: Word doesn’t have built-in tracking for checkbox selections. However, you can ask users to save their completed forms with unique filenames, allowing you to review individual responses. For advanced tracking and data collection, Microsoft Forms or specialized survey tools offer better solutions.
Q: Why don’t my checkboxes appear in print preview?
A: Checkboxes should appear in print preview and print normally. If they don’t, check that your printer settings aren’t configured to skip graphics or special formatting. Try printing to a PDF first to verify the checkboxes are actually in your document.
For comprehensive document management and security, explore resources like Lifehacker, which offers practical tips for organizing and protecting your digital files effectively.
Conclusion: Learning how to add checkbox in Word empowers you to create professional, interactive documents that serve specific purposes efficiently. Whether you’re building surveys, task lists, or official forms, the methods outlined in this guide provide flexible solutions for every situation. Start with the Developer Tab approach for maximum functionality, and remember that protecting your form ensures it remains usable and intact across multiple users and sessions. With these skills, you’re ready to transform static documents into dynamic tools that enhance productivity and communication.