How to Unhide Cells in Excel: The Simple & Essential Guide

Hidden cells in Excel can make your spreadsheets confusing and hard to navigate. Whether columns or rows have been deliberately concealed or accidentally hidden, learning how to unhide cells in Excel is a fundamental skill that takes just minutes to master. This guide walks you through every method, from basic unhiding to advanced techniques for recovering lost data.
Quick Answer: To unhide cells in Excel, select the columns or rows surrounding the hidden area, right-click, and choose “Unhide.” For entire sheets, go to the Sheet tab, right-click, and select “Unhide.” You can also use the Format menu under Cells to access unhiding options. The process works identically across Excel versions and takes seconds to complete.
Tools & Materials Needed
- Microsoft Excel (any recent version: 2016, 2019, 2021, or Office 365)
- A spreadsheet with hidden cells, columns, or rows
- Mouse or trackpad for right-click access
- Basic keyboard skills (optional, for advanced methods)
- Administrator access to your computer (usually not required)
How to Unhide Columns in Excel
Hidden columns are one of the most common reasons spreadsheets appear incomplete. When you notice gaps in your column letters (jumping from A to D without B and C visible), columns are hidden. Unhiding them is straightforward and requires only a few clicks.
Step-by-step process: First, identify the columns on either side of the hidden column. Click on the column header of the first visible column before the hidden area, then hold Shift and click the column header after the hidden area. This selects the range including the hidden columns. Right-click anywhere within your selection and choose “Unhide” from the context menu. All hidden columns within that range will immediately reappear.
For example, if columns B and C are hidden between A and D, click column A’s header, hold Shift, and click column D’s header. Your selection now spans A through D. Right-click and select Unhide, and columns B and C return to view. This method works regardless of how many columns are hidden consecutively.
If you want to unhide all columns at once, select all cells by clicking the box at the intersection of row and column headers (top-left corner), then right-click and choose Unhide. This reveals every hidden column in your entire worksheet simultaneously.
How to Unhide Rows in Excel
Hidden rows follow the same logic as hidden columns and are equally easy to reveal. You’ll notice gaps in row numbers when rows are hidden—for instance, jumping from row 5 directly to row 10. How to unhide cells in Excel when they’re rows involves selecting the surrounding rows and using the same right-click method.
Click the row number of the first visible row before the hidden section, then Shift-click the row number after the hidden area. This selects all rows in that range, including hidden ones. Right-click and select “Unhide.” All hidden rows between your selection instantly become visible again. If rows 6-8 are hidden between rows 5 and 9, select rows 5-9 and unhide to restore them.
You can also select multiple non-consecutive hidden row ranges by holding Ctrl while clicking additional row numbers, though this is less common. For maximum efficiency, select all rows by clicking the row header area’s top-left corner, then right-click and unhide to reveal every hidden row in the worksheet.

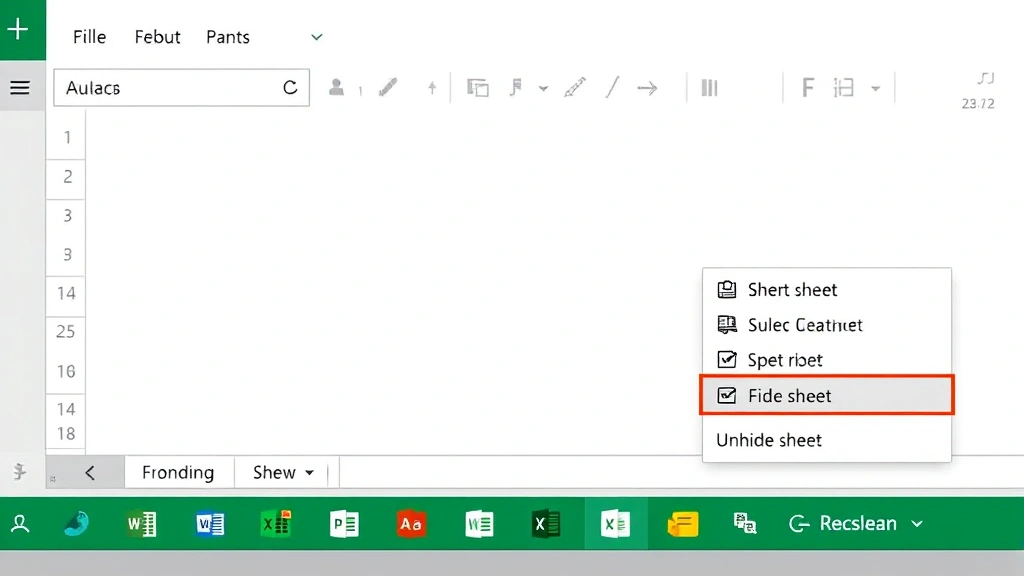
How to Unhide Entire Sheets
Beyond individual cells and rows, entire sheets can be hidden in Excel workbooks. This is useful for protecting sensitive data or organizing complex workbooks, but you may need to unhide sheets to access information. The process differs slightly from unhiding rows and columns but remains equally simple.
Right-click on any visible sheet tab at the bottom of your Excel window. Look for an “Unhide” option in the context menu. If this option appears, click it to see a list of all hidden sheets in your workbook. Select the sheet you want to reveal and click OK. That sheet tab and all its contents become visible immediately.
If you don’t see the Unhide option, no sheets are currently hidden in that workbook. Some versions of Excel also allow you to right-click the sheet navigation arrows (left/right arrows near sheet tabs) to access hidden sheets, providing an alternative method for workbooks with many sheets.
Using the Format Menu to Unhide Cells
The Format menu provides an alternative method for unhiding cells that some users find more intuitive. This approach works identically to the right-click method but accesses the same functionality through the ribbon interface.
Select the columns or rows containing hidden cells (select the visible columns/rows on both sides of the hidden area). Click the “Format” menu in the ribbon, then hover over “Column” or “Row” depending on what you’re unhiding. Select “Unhide” from the submenu. All hidden columns or rows in your selection reappear instantly.
This method is particularly useful if you prefer using menus over context menus or if you’re working with accessibility tools. The Format menu approach also works reliably across different Excel versions and operating systems, making it a dependable backup method when the right-click approach isn’t available.
Keyboard Shortcuts for Unhiding
Power users and efficiency-focused professionals often prefer keyboard shortcuts for how to unhide cells in Excel. While Excel doesn’t have a universal unhide shortcut, you can create custom shortcuts or use built-in combinations for faster workflows.
On Windows, after selecting your range, you can access the Format menu using Alt+O, then navigate to Column or Row options. On Mac, the equivalent is Control+Option+O. These keyboard combinations eliminate the need to reach for your mouse and speed up repetitive unhiding tasks significantly.
You can also assign custom keyboard shortcuts through Excel’s options menu. Go to File > Options > Quick Access Toolbar, search for “Unhide,” and assign your preferred key combination. Once configured, you can unhide cells instantly using your custom shortcut, dramatically improving productivity for users who frequently work with hidden cells.
Troubleshooting Hidden Cell Issues
Sometimes how to unhide cells in Excel becomes complicated by protection settings or unusual configurations. If your Unhide option appears grayed out or unavailable, the worksheet is likely protected. You’ll need the password to unprotect it before unhiding cells.
Go to the Review tab and click “Unprotect Sheet.” If prompted for a password, enter it. If you don’t know the password, you may need to contact the spreadsheet’s creator or administrator. Once unprotected, the Unhide option becomes available again, and you can proceed with revealing hidden cells normally.
Another issue occurs when cells appear hidden but no standard unhiding method works. This sometimes happens with filtered data. Check if AutoFilter is active (look for filter dropdown arrows in headers). Click Data > Filter > AutoFilter to toggle it off, which may reveal seemingly hidden cells that were actually filtered from view.
According to WikiHow’s comprehensive guides, verifying your Excel version and ensuring you’re using the correct menu structure prevents many troubleshooting headaches. Different Excel versions occasionally have slightly different menu locations, so consulting version-specific documentation helps resolve persistent issues.
Preventing Accidental Cell Hiding
While learning how to unhide cells in Excel is essential, preventing accidental hiding saves time and frustration. Cells are typically hidden through right-click menus or Format menu options, so awareness prevents most accidents.
If you’re working in a shared workbook, consider protecting the sheet to prevent colleagues from accidentally hiding cells. Go to Review > Protect Sheet, set a password if desired, and choose which actions users can perform. This locks the current cell visibility while still allowing editing of cell contents.
You can also train yourself to avoid the Hide option by using column width adjustments instead when you want to minimize visibility. Set a very narrow column width rather than hiding it completely, making it easier to restore visibility without searching for hidden cells later. This approach provides a middle ground between full visibility and complete hiding.
For teams using shared spreadsheets, establish clear documentation about which cells or sheets are intentionally hidden and why. This communication prevents confusion and reduces unnecessary unhiding requests. As reviewed by Consumer Reports’ technology guides, clear documentation and standardized procedures improve team efficiency significantly.
Related Excel Features Worth Exploring
Understanding hidden cells connects to several related Excel features that enhance your spreadsheet management skills. Learning how to freeze panes in Excel helps you keep headers visible while scrolling, reducing the need to hide cells. Similarly, knowing how to freeze a row in Excel provides an alternative method for managing large spreadsheets without hiding data.
If you’re organizing complex data, discovering how to pin a row in Excel offers another powerful visibility management tool. For data consolidation tasks, understanding how to combine two cells in Excel and how to merge two columns in Excel provide complementary techniques for reorganizing spreadsheet structures efficiently.
Advanced Techniques for Power Users
Advanced Excel users often employ VBA (Visual Basic for Applications) macros to automate unhiding tasks across multiple workbooks or sheets. Recording a macro that selects all cells and unhides everything creates a one-click solution for repetitive tasks.
To create a macro, go to View > Macros > Record Macro, then perform your unhiding steps manually. Save the macro with a memorable name like “UnhideAll.” Subsequently, you can run this macro instantly using View > Macros > Run Macro, eliminating the need to repeat steps.
For developers, learning VBA code for unhiding provides ultimate flexibility. The basic syntax involves selecting a range and setting its Hidden property to False. This programmatic approach scales efficiently for enterprise workbooks with hundreds of sheets or complex hiding configurations.
According to Lifehacker’s productivity articles, mastering these advanced techniques transforms Excel from a basic spreadsheet tool into a powerful automation platform. Investment in learning VBA pays dividends for professionals handling large datasets regularly.
FAQ
Q: Can I unhide all hidden cells at once in Excel?
A: Yes. Click the select-all button (intersection of row and column headers), right-click, and choose Unhide. This reveals every hidden row, column, and cell in your worksheet simultaneously, providing the fastest method for complete visibility restoration.
Q: What’s the difference between hidden and filtered cells in Excel?
A: Hidden cells are manually concealed and don’t appear in any view. Filtered cells are temporarily hidden based on criteria you set but remain part of the dataset. Unhiding works for hidden cells; for filtered cells, you adjust filter settings instead.
Q: Will unhiding cells affect my formulas or data?
A: No. Unhiding only changes visibility; it doesn’t modify data, formulas, or calculations. Any formulas referencing hidden cells continue working identically before and after unhiding.
Q: Can I unhide individual cells, or only entire rows and columns?
A: Excel hides cells at the row or column level, not individually. When you unhide, you restore entire rows or columns. Individual cells can’t be hidden independently in standard Excel functionality.
Q: How do I know if my worksheet has hidden cells?
A: Look for gaps in row numbers or column letters. If you see row 5 followed directly by row 10, rows 6-9 are hidden. Similarly, columns jumping from C to F indicate hidden columns D and E. You can also check by selecting all cells and using the Format menu to see if Unhide is available.
Q: Is there a way to prevent others from unhiding my hidden cells?
A: Yes. Protect your sheet (Review > Protect Sheet) and choose not to allow users to “Format Columns” or “Format Rows.” This prevents them from unhiding cells while still allowing data editing. Set a password for additional security.
Q: Can I unhide cells in Excel on Mac?
A: Absolutely. The process is identical: select surrounding rows/columns, right-click, and choose Unhide. Mac users can also use the Format menu with the same steps as Windows users, ensuring consistent functionality across platforms.
Q: What should I do if the Unhide option doesn’t appear?
A: First, verify you’ve selected the correct range (rows or columns on both sides of hidden cells). If Unhide still doesn’t appear, the sheet is likely protected. Go to Review > Unprotect Sheet, enter the password if prompted, then try unhiding again.