How to Insert a Line in Word: Easy & Essential Guide

Adding lines to your Microsoft Word documents is a fundamental skill that enhances formatting, organization, and visual clarity. Whether you’re creating a formal document, filling out a form, or designing a professional template, knowing how to insert a line in Word saves time and improves your document’s appearance. This guide walks you through every method available, from simple keyboard shortcuts to advanced drawing tools, ensuring you can tackle any line-insertion task with confidence.
Quick Answer: The fastest way to insert a line in Word is using the keyboard shortcut: type three hyphens (—) and press Enter to create a horizontal line instantly. Alternatively, use the Insert menu, select Shapes, choose a line tool, and click-drag across your document. For more control, access the Borders and Shading options through the Design tab to add lines to paragraphs or tables.
Keyboard Shortcut Method: The Fastest Way to Insert a Line
The keyboard shortcut method is the quickest way to insert a line in Word for most users. Simply position your cursor on a blank line where you want the line to appear, type three consecutive hyphens (—), and press Enter. Word automatically converts this into a full-width horizontal line that spans your document. This method works in Microsoft Word 2010 and later versions on both Windows and Mac.
This auto-formatting feature is incredibly useful for separating sections, creating dividers between content blocks, or adding visual breaks without accessing menus. The line generated this way is typically a standard black line that matches your document’s default formatting. If you need the line to span a different width or have specific styling, you can adjust it after creation by selecting the line and using the Format menu.
One important note: this method only works when the three hyphens are on their own line with nothing else typed on that line. If you type text before or after the hyphens, Word won’t convert it to a line. Additionally, if AutoFormat is disabled in your Word settings, this shortcut won’t function—you’ll need to enable it in File > Options > Proofing > AutoCorrect Options.
Pro Tip: You can also use three underscores (___) or three asterisks (***) to create lines with different styles. The underscore method creates a thicker line, while asterisks produce a dotted line effect, giving you quick styling options without opening additional menus.
Using the Insert Menu: Comprehensive Line Options
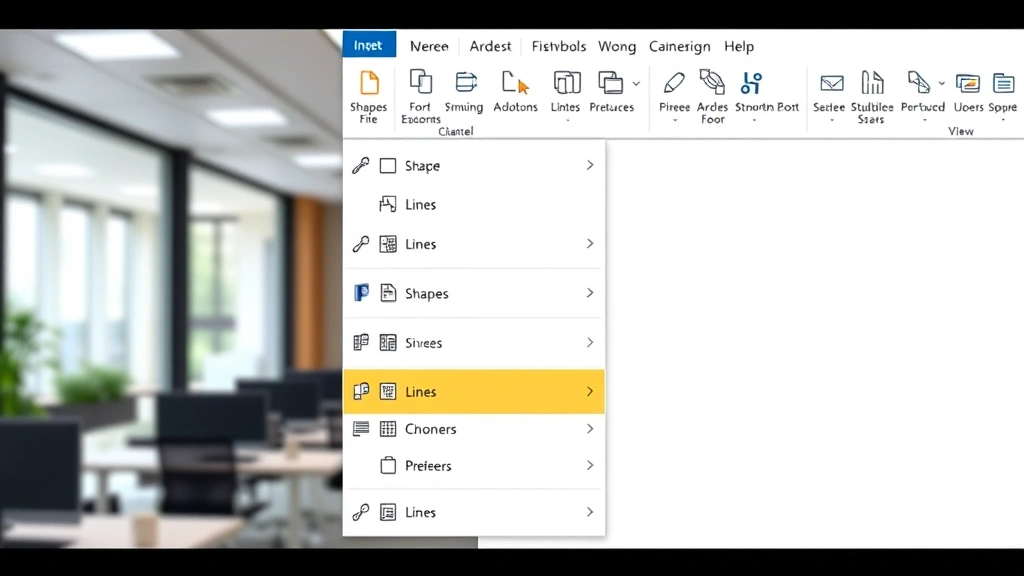
The Insert menu provides a more deliberate approach to how to insert a line in Word with greater control over placement and styling. Navigate to the Insert tab on your ribbon, then locate the Shapes dropdown menu. From there, select Lines and choose your preferred line style—straight, curved, arrow, or connector options are typically available. Click and drag across your document to draw the line exactly where you want it.
This method allows you to customize line length, angle, and position with precision. After drawing your line, you can right-click on it to access formatting options including line color, thickness, style (solid, dashed, dotted), and effects like shadows or 3D appearance. The Insert menu method is ideal when you need multiple lines with varying styles or when you want lines at specific angles rather than horizontal across the page.
To insert a line using this method, first ensure you’re on the Insert tab of the ribbon. Look for the Shapes icon, which typically shows a collection of geometric shapes. Click the dropdown arrow next to Shapes to reveal the full menu, then navigate to the Lines section. Select your desired line type and your cursor will change to a crosshair, ready for drawing. Click your starting point, hold down the mouse button, and drag to your ending point to create the line.
You can also hold Shift while dragging to create perfectly straight horizontal or vertical lines, which is helpful for maintaining alignment in your document. After creating the line, it remains selected (shown by small handles at each end), allowing you to immediately adjust its properties or move it to a different location.
Advanced Shapes and Drawing Tools for Custom Lines
For more sophisticated line insertion, Word’s drawing tools offer extensive customization options. Access the Drawing Tools by clicking Insert > Shapes, then explore beyond basic lines to include connectors, freeform shapes, or callout boxes with lines. These tools are particularly valuable when creating flowcharts, diagrams, or complex document layouts that require inserting lines in Word as part of a larger design.
The Connector lines are especially useful for technical documents and flowcharts. These lines automatically adjust their path when you move connected shapes, maintaining alignment and organization. To use connectors, draw your shapes first, then select Insert > Shapes > Connectors, and choose your connector style. Click on one shape’s connection point, then click on another shape’s connection point to create an intelligent line between them.
Word also offers the Drawing Canvas feature, which creates a designated area for complex line drawings and shapes. Access this through Insert > Shapes > New Drawing Canvas. The canvas provides a contained workspace where you can create multiple lines and shapes that move together as a unit, preventing accidental displacement of your design elements throughout the document. This is invaluable for maintaining document integrity when you have intricate diagrams or decorative line arrangements.
After inserting your lines through the Shapes menu, right-click to access the Format Shape panel. Here you’ll find options for line color, weight (thickness), dash style, transparency, and shadow effects. You can also set the line to begin or end with arrows, which is essential for directional diagrams and flowcharts.
Borders and Shading Options: Paragraph and Page Lines

The Borders and Shading feature provides another powerful method for inserting lines in Word, particularly when you want lines associated with specific paragraphs or entire pages. This approach is different from drawing lines because these borders are tied to text elements, making them ideal for formal documents, forms, and structured layouts. Access this feature through the Design or Home tab (depending on your Word version), then look for Borders.
To apply a border to a paragraph, first select the paragraph you want to modify. Then navigate to Home > Borders > Borders and Shading. A dialog box opens offering preset border options: all borders, top and bottom only, top only, bottom only, or custom configurations. You can also specify the line style (solid, dashed, dotted, double), color, and width. This method is excellent for highlighting important sections or creating visual separation between different content areas.
Page borders are another valuable option for inserting lines in Word around your entire document. Go to Design > Page Borders, then select Box, Shadow, 3D, or Custom options. Page borders frame your entire document with lines, which is common in formal letters, certificates, and official documents. You can customize the style, color, and width of these page borders to match your document’s aesthetic.
For table-based documents or forms, you can insert lines by modifying table borders. Select your table, right-click, and choose Table Properties. Navigate to the Borders and Shading tab to customize which borders appear and their styling. This approach is particularly useful when inserting lines in Word documents that need to guide users filling out forms, as lines can indicate where information should be entered.
Lines in Tables and Grid Layouts: Structured Organization
Tables are a structured way to insert lines in Word while organizing content simultaneously. When you insert a table, Word automatically creates grid lines that help organize information. You can modify these lines extensively through table design options. Select your table, then navigate to Table Design to choose from predefined table styles that feature different line configurations.
If you need more control, right-click your table and select Table Properties > Borders and Shading. Here you can individually control which borders appear (top, bottom, left, right, inner horizontal, inner vertical) and their styling. This granular control allows you to create custom table layouts with lines exactly where you need them. For instance, you might want visible lines only on the top and bottom of each row, creating a clean, professional appearance.
Grid lines are different from borders—they’re visual guides that appear in your editing view but don’t print. To toggle grid lines on or off, go to Table > View Gridlines. Grid lines help you see the table structure while editing but won’t appear in your final printed document unless you’ve applied actual borders. This distinction is important when inserting lines in Word tables, as you want to ensure your intended lines will print correctly.
You can also use table lines creatively to create forms. Insert a table with multiple rows and columns, remove most borders, and keep only the bottom border of specific cells to create signature lines, name lines, or data entry fields. This technique is widely used in official documents, contracts, and survey forms where users need designated spaces to write information.
Advanced Formatting Techniques: Professional Line Styling
Once you’ve mastered basic line insertion, advanced formatting techniques elevate your document’s professionalism. When you insert a line in Word using any method, you can apply sophisticated styling through the Format menu. Right-click your line and select Format Shape (or Format Line, depending on the line type) to access comprehensive customization options.
Advanced styling options include gradient fills for lines, transparency adjustments for layered designs, and shadow effects for depth. You can create compound lines (lines with multiple colors or patterns), apply glow effects, or add 3D formatting. These techniques are particularly useful in marketing documents, presentations, or creative templates where visual impact matters.
Layering multiple lines with different colors, thicknesses, and transparency levels creates sophisticated visual effects. For example, you might place a thick colored line behind a thinner white line to create a border effect, or use semi-transparent lines to create a watermark-like appearance. Experimentation with these tools helps you develop a signature document style.
You can also save custom line styles as Quick Styles for future use. After formatting a line exactly as you want it, right-click and select Save as a Quick Style. Name your style and it will appear in your Styles gallery for quick application to future lines. This workflow efficiency is invaluable when working on multiple documents that require consistent line styling.
According to WikiHow‘s comprehensive guides, mastering these formatting techniques is essential for professional document creation. Similarly, Family Handyman emphasizes the importance of precision tools for any project, including digital document design.
Troubleshooting Common Issues When Inserting Lines
Sometimes inserting lines in Word doesn’t work as expected. If the three-hyphen shortcut doesn’t create a line, check that AutoFormat is enabled. Go to File > Options > Proofing > AutoCorrect Options, then verify that the “Replace hyphens with dash” option is checked. This setting controls whether Word converts your typed hyphens into formatted lines.
If lines appear but don’t display correctly when printing, check your printer settings and ensure that graphics are set to print. Some printers have options to skip graphics or reduce quality, which can affect line appearance. Test print a small document with your line to verify the output quality before printing important documents.
Lines that disappear or move unexpectedly often result from text wrapping settings. If you’ve drawn a line and it seems to shift when you edit text, right-click the line and check its text wrapping setting. Change it from “In Line with Text” to “Square” or “Tight” if you want the line to maintain its position regardless of text changes.
If you’re having trouble selecting a line to format it, try clicking directly on the line itself rather than near it. If the line is very thin, this can be challenging—use the keyboard shortcut Tab to cycle through objects on your page until the line is selected. Once selected, you’ll see selection handles at each end, confirming the line is active.
Performance issues with complex documents containing many lines can be resolved by converting drawn lines to borders when possible. Borders are more efficient for Word to render than individual drawn objects, so using paragraph or page borders instead of multiple drawn lines can improve document responsiveness, especially on older computers.
For more detailed troubleshooting advice, The Spruce offers excellent problem-solving frameworks applicable to digital tools. Additionally, Consumer Reports provides technology guidance that can help you optimize your software settings.
Related Tasks and Document Formatting
Understanding how to insert a line in Word connects to broader document formatting skills. If you’re working with multi-page documents, you may also need to delete pages in Word to maintain proper spacing and layout. Similarly, if you’re creating documents that reference online sources, knowing how to cite an internet source in MLA format ensures your documents meet academic or professional standards.
For users who also work with Excel spreadsheets, understanding line insertion complements skills like wrapping text in Excel and adding up a column in Excel. These Microsoft Office applications share similar design philosophies, and mastering one enhances your productivity in others.
Additionally, if you frequently send formatted documents via email, learning how to BCC in Outlook ensures you can professionally distribute your documents while protecting recipient privacy. For even more detailed information on document creation, our comprehensive guide on adding a line in Word provides additional techniques and best practices.
FAQ
Q: What’s the quickest way to insert a line in Word?
A: Type three hyphens (—) on a blank line and press Enter. Word automatically converts this into a horizontal line spanning your document. This keyboard shortcut is the fastest method for basic line insertion.
Q: Can I insert a vertical line in Word?
A: Yes. Use Insert > Shapes > Lines and select a line tool. Hold Shift while dragging downward to create a perfectly vertical line. Alternatively, use table borders or paragraph borders configured to show only left or right borders for vertical line effects.
Q: How do I change the color of a line I’ve inserted?
A: Right-click the line and select Format Shape or Format Line. In the panel that appears, find the Line Color option and choose your desired color. You can select from preset colors or create a custom color.
Q: Will my inserted lines print correctly?
A: Most lines print correctly if your printer settings include graphics. Test print a small document with your line first. If lines don’t appear in the printout, check your printer properties to ensure graphics printing is enabled.
Q: Can I insert a line that stays in place when I edit text?
A: Yes. Use paragraph borders or page borders instead of drawn lines. These remain anchored to text or page structure. Alternatively, draw a line and set its text wrapping to “Square” or “Tight” to prevent it from moving with text edits.
Q: What’s the difference between a border and a drawn line?
A: Borders are tied to paragraphs, pages, or table cells and move with that content. Drawn lines are independent objects positioned freely. Use borders for structured documents and drawn lines for creative designs or diagrams.
Q: How do I delete a line I’ve inserted?
A: Click on the line to select it (you’ll see selection handles), then press Delete. For borders, select the paragraph or table, access Borders and Shading, and choose “None” to remove the border.
Q: Can I insert multiple lines at different angles?
A: Yes. Use Insert > Shapes > Lines and draw each line individually. Hold Shift while dragging to constrain lines to horizontal, vertical, or 45-degree angles. For free-angle lines, draw without holding Shift.