How to Wrap Text in Excel: Easy & Essential Guide

Text wrapping in Excel is a game-changer for readability. When your data extends beyond cell boundaries, wrapping automatically displays multiple lines within a single cell instead of spilling over or getting cut off. This simple feature transforms cluttered spreadsheets into organized, professional documents. Whether you’re managing project names, client feedback, or detailed descriptions, learning how to wrap text in Excel saves time and improves data presentation. Let’s explore the quickest methods to activate this feature and master advanced formatting options.
Quick Answer: To wrap text in Excel, select your cells, then click the “Wrap Text” button in the Home tab (Alignment group). Alternatively, use Format > Cells > Alignment > Wrap Text. Your content will automatically adjust to fit within cell boundaries across multiple lines, with row heights expanding automatically.
Tools & Materials You’ll Need
- Microsoft Excel (2016, 2019, 2021, or Office 365)
- A spreadsheet with data requiring text wrapping
- Basic familiarity with cell selection
- Optional: Keyboard shortcuts for faster workflow
Basic Method: Using the Wrap Text Button
The fastest way to wrap text in Excel is using the dedicated Wrap Text button on the ribbon. This method takes seconds and works for single cells or entire ranges. Start by selecting the cell or cells where you want how to wrap text in Excel to apply. Click anywhere within your target area, then drag to select multiple cells if needed. For an entire column, click the column header; for an entire row, click the row number.
Once selected, navigate to the Home tab on the Excel ribbon. Look for the Alignment group—you’ll see the “Wrap Text” button featuring a text icon with lines. Click it once, and Excel automatically enables text wrapping for your selection. Your data will immediately reformat, with longer text breaking into multiple lines within cells. Row heights adjust automatically to accommodate the wrapped content, ensuring nothing gets hidden.
This method is ideal for quick formatting tasks and works consistently across all Excel versions. The visual feedback is immediate, letting you see results instantly without navigating menus.
Format Cells Dialog Method
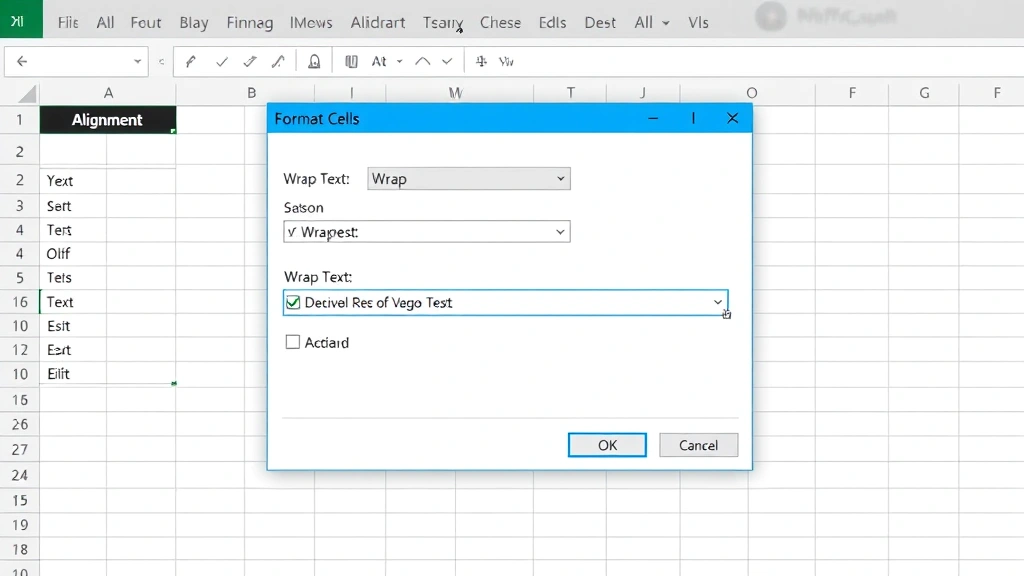
For more control over text wrapping settings, the Format Cells dialog offers comprehensive options. Right-click on your selected cells and choose “Format Cells” from the context menu. Alternatively, press Ctrl+1 (Windows) or Cmd+1 (Mac) to open the dialog instantly. This method pairs well with other formatting adjustments, allowing you to wrap text while modifying alignment, fonts, or borders simultaneously.
In the Format Cells dialog, click the Alignment tab. You’ll find the “Wrap Text” checkbox in the Text Control section. Check this box to enable text wrapping. This dialog also lets you adjust vertical alignment (top, center, bottom), horizontal alignment (left, center, right), and text rotation—all in one place. Advanced users appreciate this consolidated approach when performing multiple formatting tasks on the same selection.
After enabling wrap text here, click OK to apply changes. The dialog method is particularly useful when you’re already adjusting other cell properties and want to maintain workflow efficiency.
Keyboard Shortcuts for Quick Access
Power users know that keyboard shortcuts accelerate productivity when working with how to wrap text in Excel regularly. While Excel doesn’t have a single dedicated shortcut for wrap text alone, you can combine commands for efficiency. Press Ctrl+1 to open Format Cells, navigate to Alignment, and toggle wrap text—this becomes second nature with practice.
Alternatively, create a custom keyboard shortcut by accessing Excel’s Quick Access Toolbar. Click the dropdown arrow next to the toolbar, select “More Commands,” find “Wrap Text,” and assign your preferred shortcut. Some users assign Ctrl+Shift+W for convenient access. This customization eliminates ribbon navigation entirely, letting you wrap text with a simple key combination.
For Mac users, the process mirrors Windows: Cmd+1 opens Format Cells, then navigate to Alignment and enable wrap text. Consistent use of shortcuts dramatically reduces formatting time across large projects.
Auto-Adjusting Row Heights with Wrapped Text
When you enable text wrapping, Excel automatically increases row height to display all wrapped content. However, understanding this behavior helps you manage spreadsheet appearance effectively. By default, row height adjusts immediately when you apply wrap text, preventing text from being hidden or cut off.
If row heights don’t adjust automatically, you can manually set them. Double-click the border between row numbers to auto-fit the height to content. Alternatively, right-click the row number, select “Row Height,” and enter a specific measurement. For multiple rows, select them all, then double-click any border between row numbers to auto-fit all simultaneously.
This feature becomes especially valuable when combined with other formatting techniques. If you’re also learning how to freeze a row in Excel, understanding row height management ensures your frozen headers display properly alongside wrapped content in other rows. Proper row height management maintains visual hierarchy and readability throughout your spreadsheet.
Advanced Formatting Options
Beyond basic text wrapping, Excel offers sophisticated formatting combinations that enhance data presentation. When you wrap text, consider pairing it with vertical alignment settings. Center-aligned wrapped text often looks more professional than top-aligned text, especially in headers or summary cells. Access these options through Format Cells > Alignment tab.
Text rotation works beautifully with wrapped text for creating dynamic headers. Rotate your header text 45 degrees while enabling wrap text to create diagonal headers that save horizontal space. This technique is particularly useful in data-heavy spreadsheets where column width is limited.
For enhanced data organization, combine text wrapping with how to lock cells in Excel to protect formatted content from accidental modifications. You can also integrate text wrapping with how to add drop down list in Excel for cells containing predefined options with longer descriptions. These combinations create professional, functional spreadsheets that guide users toward correct data entry.
Border formatting complements wrapped text exceptionally well. Add borders around wrapped cells to visually separate content blocks and improve readability. Conditional formatting can also highlight wrapped cells based on criteria, making important information stand out immediately.
Troubleshooting Common Issues
Sometimes text wrapping doesn’t work as expected. The most common issue is that row height remains too small to display wrapped content. Solution: manually adjust row height by double-clicking the row border or right-clicking and selecting “Row Height.” Ensure the height value accommodates your longest wrapped text line.
Another frequent problem occurs when merged cells contain wrapped text. Excel sometimes struggles with height adjustment in merged cells. Solution: unmerge cells if possible, or manually set row height to accommodate all content. If merging is necessary, set row height before applying text wrapping.
If wrapped text appears cut off on printed pages, check your print settings. Go to File > Print > Page Setup and verify that “Fit to Page” isn’t compressing your spreadsheet. Adjust margins or page orientation to accommodate wrapped content. Preview your print layout before printing to catch these issues early.
When working with large datasets, text wrapping can make scrolling slower on older computers. If performance suffers, consider wrapping text only in specific sections rather than the entire spreadsheet. This balanced approach maintains readability without sacrificing speed.
Best Practices for Text Wrapping in Excel
Effective use of how to wrap text in Excel requires strategic thinking beyond simply enabling the feature. First, establish consistent formatting rules across your spreadsheet. If you wrap text in one data section, apply the same formatting to similar sections for visual consistency. This professional approach helps users navigate your spreadsheet intuitively.
Combine text wrapping with appropriate column widths. Don’t make columns excessively narrow, forcing excessive wrapping that creates tall rows. Instead, find balance—wide enough to display most content on one or two lines, but not so wide that it wastes space. A column width of 30-40 characters typically provides good balance for wrapped text.
Use text wrapping strategically in headers, comments, and description columns. Avoid wrapping in numeric columns or cells containing short values, as it wastes vertical space. This selective approach keeps your spreadsheet compact while improving readability where it matters most.
When sharing spreadsheets with others, document your formatting decisions. Include a legend or instructions explaining why certain cells use text wrapping. This guidance helps collaborators understand your design choices and maintain consistency when editing. Consider protecting wrapped cells to prevent accidental format changes, especially in templates you distribute widely.
Test your wrapped text formatting across different screen sizes and zoom levels. What looks perfect at 100% zoom might become problematic at 75% or 125%. Ensure your formatting remains functional across typical viewing conditions your users will encounter.
For complex spreadsheets, explore how text wrapping integrates with other features. If you’re learning how to find duplicates in Excel, you might wrap text in a notes column explaining why duplicates exist. If you’re figuring out how to unhide all rows in Excel, ensure hidden rows don’t contain wrapped text that might surprise users when unhidden. These considerations create polished, professional spreadsheets.
According to WikiHow’s comprehensive guides, proper text formatting significantly improves data comprehension. As reviewed by Family Handyman’s practical tutorials, organization principles apply equally to spreadsheet design. HowStuffWorks explains that visual clarity directly impacts user efficiency with any tool, including Excel.
FAQ
Can I wrap text in only part of a cell? No, text wrapping applies to the entire cell. However, you can use line breaks within a cell by pressing Alt+Enter (Windows) or Ctrl+Option+Enter (Mac) to manually create multiple lines, then enable text wrapping for better control.
Does text wrapping affect printing? Yes, wrapped text prints exactly as displayed on screen. Verify your print preview before printing to ensure wrapped content fits properly on your page. Adjust margins or page orientation if needed to accommodate wrapped text in printed output.
How do I remove text wrapping? Select cells with wrapped text, click the Wrap Text button again to toggle it off, or use Format Cells and uncheck the Wrap Text option. Row heights remain unchanged, so manually adjust them if needed to return to original heights.
Will text wrapping work in all Excel versions? Yes, text wrapping is available in Excel 2016, 2019, 2021, and Office 365. The feature also works in Excel Online, though the interface differs slightly. Older versions like Excel 2010 support text wrapping identically.
What’s the difference between text wrapping and shrink to fit? Text wrapping breaks content into multiple lines within a cell while maintaining font size. Shrink to fit reduces font size to fit content on one line. Choose wrapping for readability, shrink to fit for space efficiency.
Can I wrap text in formulas? Yes, cells containing formulas display their results wrapped just like regular text. The wrapping applies to the displayed result, not the formula itself, which remains in the formula bar.
How does text wrapping interact with merged cells? Text wrapping works in merged cells but sometimes struggles with height adjustment. If wrapped text appears cut off in merged cells, manually increase row height or unmerge cells if possible for better results.
Is there a way to auto-wrap text for an entire column? Yes, click the column header to select the entire column, then click the Wrap Text button. This applies wrapping to every cell in that column, with individual row heights adjusting as needed based on content.
Learning how to wrap text in Excel transforms your spreadsheet management capabilities. From basic button clicks to advanced formatting combinations, this essential skill improves data presentation, readability, and professional appearance. Whether you’re creating reports, managing projects, or organizing data, text wrapping ensures your information displays clearly and accessibly. Start with the basic method today, practice keyboard shortcuts for efficiency, and gradually explore advanced formatting options as your needs evolve. Your spreadsheets will look more polished, your data more comprehensible, and your workflow more efficient.